21 May 2014

D-Day Landings Part 2: Sword Beach Re-fought: Lion-sur-Mer and Hermanville-sur-Mer

D-Day Landings Part 2: Sword Beach Re-fought: 

Lion-sur-Mer and Hermanville-sur-Mer


La ville d' Lion Sur Mer, Hermanville-sur-Mer farms in the distance.
L to R: Artillery observation tower/bunker, the Riva Bella casino (German HQ)
Dug in 716. Inf.Div Troops, HMG Bunker, HMG Pillbox, LMG dug in
Heer Artiller and Luftwaffe 88mm guns in place.

An uneasy dawn broke over Lion-sur-Mer in Normandy. It is 6 June 1944. English and Americans ships had bombed the area significantly since midnight...

Surely they would not launch an attack in such foul weather. Surely this is just a diversion, as everyone knows their attack will come at the Pas de Calais...

At 0300, the Allied air forces bombarded the German beach defenses for the final time before the amphibious invasion. A few hours later, British warships bombarded German gun batteries and other strong-points along Sword Beach. At daybreak, British destroyers closed in and fired at short range. At 05.10 hours, Royal Air Force aircraft laid a smoke screen to shield the invasion force, but the smokescreen was used by boats of the German 5th Torpedo Boat Flotilla to attack, firing 15 torpedoes and scoring one hit, sinking the destroyer Svennert. 

At 05.30, soldiers began embarking landing craft. At 0600, LCA landing craft began sailing for Queen Red and Queen White sectors, joined by waves of various landing craft every few minutes. 


Sword Beach from the Air at low tide

Wildcards: Both teams rolled an extra +1 to reinforcement rolls for armour.
The winner would be the Army that held the objectives (Bella Riva Casino/Observation tower) and Road to Caen.

Turn 1: 

As the landing craft closed, LCT(R) vessels fired a total of 1,064 5-inch rockets, knocking out some beach obstacles, 2 troop units of infantry. Shortly after, at the range of 7,000 yards, self-propelled guns of the UK 3rd Division began to fire from their vessels to knock out beach obstacles. 

At the distance of 5,000 yard to the beach, 40 duplex-drive Sherman tanks of the UK 13th/18th Hussars were launched; historically 31 of them would make it to the beach successfully. By this point, all German guns were firing at the landing craft, and the Allied formation began to break up...
The D-day assault on Sword Beach was in full swing 


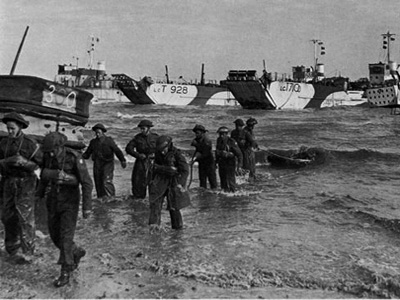
First Wave of Allied troops land: 2nd East Yorks Engineers/sappers supported by DD M4 Shermans
Several Higgins boats have already refloated 
DUKWs bring in weapons teams bearing mortars in the 3rd wave.

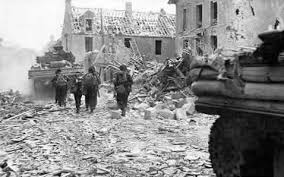
07.25 hours, the infantry arrived on the beach, which quickly attracted fire from machine guns and other small arms. The UK 2nd East Yorkshire sappers which landed on Queen Red sector, experienced a tough fight as they attempted to dash across an area bombarded by 88-millimeter and 75-millimeter guns inland, while being raked by HMG and LMG machine gun fire. 

The Germans returned fire in their turn, and picked off a surprising number of English command teams. It may be due to the fact that many wore their officer's caps and carried swagger sticks, making them easily identifiable to the German gunners.

Turn 2: 
Shortly behind the initial wave were 24 landing craft carrying British Royal Marine commandos. The commandos landed on the extreme western end of Queen White sector and moved toward the German strong-point at Lion-sur-Mer, which would serve as the link-up between Sword and Juno Beaches. The first target of the commandos was the casino at Riva Bella, which had been turned into a formidable fortress of interlocking bunkers, trenches, wire entanglements, and minefields, and housed the German HQ

Leading the attack on Riva Bella was French Captain Phillippe Kieffer, commanding officer of two groups of French commandos attached to the British Royal Marines, thus making this attack a purely French effort. Kieffer attacked Riva Bella at two locations from the rear with small arms, personal anti-tank weapons, and grenades, but the commandos were soon stalled by the German defenses proving to be difficult for Allied weapons to penetrate, with well dug in infantry. (Objective 1)


Kieffer found a duplex-drive Sherman medium tank, and persuaded the tank to assist the assault on Riva Bella. The Sherman tank failed to knocked out the defenses, trapping the commandos on the beach, exposed to a cross-fire between two pill-boxes. (Contrary to the real history)


To the east, British commandos attacked the German gun battery at the mouth of River Orne from the sea, in an attempt as ill-fated as the Dieppe raid. (More about that in a different post.) 

Machine gun nests, tank traps and minefields protected the battery. In the center of the battery was a 56-foot high concrete tower that housed the control and ranging equipment for the coastal guns; though not a defensive structure, German troops made effective use of the tower's height to observe British movements to relay down to the defenders on the ground, meanwhile throwing grenades down at close-by British commandos as opportunities presented.This gun battery, with its concrete tower, would remain in German control for a days to come. (Objective 1)


The German battery at Hermanville-sur-Mer received the co-ordinates for the beaches from the observation tower, but to their dismay found that their shells fell short, and failed to inflict any damage on the enemy.

Only the coastal defense 88mm and 75 mm guns were able to put some Shermans out of action and pin the sappers down. A bitter lesson learnt - make sure your artillery is within striking range of the target!


Heer Artillery: LeFH18 with 20mm Quad Vierling mounted on half-track: The initial landings were out of their range, and they could but idly wait for Allied forces to move to within striking range.


Second Wave: More Sappers and LCTs disgorging  M4 Shermans. These were eventually successful in destroying the pill-boxes, but not the concrete enfilade bunker. A high cost was pain by the sapper units, particularly amongst their officers. Thank goodness for the British Bulldog rule and the good ol' NCOs. Lesser men would have crumbled.


DD Shermans come ashore as more M4s with Firefly VC Command tanks land from LCTs

Turn 3 saw yet more troops land, this time with mortars. The heavy weapons proceeded to rain destruction on the 716.Inf Div troops, who took shelter, and survived the onslaught dug into their trenches. A Typhoon flight took out numbers with their rockets in 2 separate attacks in turn 1 and 3, but were apparently intercepted by the Luftwaffe in turn 2. There was no German aircraft to be seen whatsoever. The Allies had complete air superiority. The huddled troops in the embankments paid the price. But there was no-where to run too. Feldmarschall Rommel's displeasure would be worse than any Tommy's bayonet!

Turn 2 saw Oberst Leutnant Fischer's 21.er Pz Div Stugs arrive. They barrelled down the road towards Lion-sur-Mer, but diverted towards Ouistreham when the radio message was received that the bridges and lock over the Orne River was under attack from Allied airborne and commando troops. 

The defense of the coastal towns was thus left to the gun emplacements and dug in infantry. 
Word had also been received from the east, where it Pz IVs were ready to engage the enemy.  

Photo Roly Hermans
Typhoons unleashing 60 lb rockets on the dug in 716. Inf. Div: 
A payload equal to that of a Lancaster bomber! 
The 21.er Pz Div Stug Abteilung decided to detour to try and counter the Paratroop attack on the Orne river. The commando teams landed to the left were decimated by accurate and sustained Spandau fire from the pillboxes, and failed to reach their objective, despite assistance from the DD Shermans
 

Herr General der Infanterie Division inspecting
 the 21.er Panzer Div. Stug Abteilung as they arrive on the table


More Shermans land as LeFH 18 artillery shells fall harmlessly in the water

All too soon dusk fell, and we had to call and end to the battle. The invasion forces were still firmly trapped on the beach. Mine fields, tank traps and barbed wire had prevented the tanks from making inroads, and the sappers had failed to clear the defenses. 
The Commandos were left leaderless, with Kieffer himself succumbing on the sand. 

Both objectives were still in German hands. Had the battle had continued for more turns the tide would eventually have turned, but in this alternative battle the German forces were the victors.

More photos:


20 May 2014

Battle Report: Sword Beach D-Day: Luc-Sur-Mer

Battle Report: D-Day Sword Landings Part 1: Luc-Sur-Mer

Dawn broke on the 6th of June 1944. The German lines at Luc-Sur Mer had taken a beating from Allied bombers overnight. One of the multi-story buildings on the waterfront had been all but destroyed, but the Ost Truppen huddled in the trenches and the bunkers remained unscathed.


" Herr Leutnant! Englischer Schiffe!" The junior officer visibly paled when he brought his binoculars to his eyes. As far as he could see the horizon was packed with ships. The next moment naval shells screamed overhead.

 " Es fingt an..." -  It has started, he said. Here's to hoping these Ost Truppen will hold!


Luc-sur-Mer at Dawn 6 June 1944: German occupation troops dug in, 
88mm Bunker and 75mm Tank Turret to theright, at left, Pillbox HMG and LMG, 
rocket launcher battery and Pak 40s in fields beyond

The gamers rolled first for wild cards- the Luc-sur-Mer (LSM) sector of the board rolled improved skills for the Infantry: Went from reluctant trained to confident veteran, a useful roll. Allies rolled for extra armour support (+1 to rolls for armoured reinforcement landing)

Turn 1: The allies went first (as per the real battle): First a preliminary naval bombardment, which took out one of the Flak Vierling AA guns protecting the rocket launcher battery set in the fields beyond LSM.

The landing craft arrived, disgorging sappers on the beach, and calling in a flight of Hawker Typhoons. 3 aircraft made it to the area, and attacked the dug in troops in the trenches facing the beaches. The dug in Ost Truppen (now confident veterans) lost some platoons, but held, ready for the coming onslaught


The first British wave to land: Sappers of the 22nd Dragoons (3rd Inf Div)
Their task to destroy the beach defenses to allow the tanks to move into LSM

Germans returned fire, taking out the lead sapper command group with their machine-gun fire and fire from the trenches. The sappers were unlucky enough to be just within the range of the nebelwerfers, which then proceeded to unleash a hail of death upon them. The survivors of the first wave were pinned down on the beach, and failed to reach the minefields and tank barriers they were attempting to destroy, to allow the masses of tanks in LCTs approaching in the second wave of landings.


The Nebelwerfers dug in near the town's water supply unleash their deadly barrage on the beaches:
Ost Truppen and 88mm AA gun protecting their flank and frontal arc respectively


Turn 2: More sappers land and a flight of Typhoons deliver more death to the German trenches.
Well fortified and dug in, they survive the ordeal, but radio for AA support.
 Where is " Der verdamte Luftwaffe? "

Turn two saw some allied tanks make it to the beach- a unit of DD Sherman tanks. These waded out of the water before opening fire on the German emplacements. A heavy MG nest was taken out by this assault. The second wave of landing craft also deployed more sappers, who hurried up the beach, only to meet the same fate as those landed in the first wave.

These however had learned from their compatriots' misfortune, and stayed out of range of the rocket launchers. A single surviving troop of the first landing made it to the beach defenses, and started preparing the way for the next landing of tanks. The dug in static German Infantry, in trenches and buffed up to confident veterans withstood wave on wave of attack, with minimal casualties.

The Germans brought up a 37 mm AA gun mounted on a half-track to defend the infantry from the incessant harrasment by the RAF, only to find the fiendish pilots changing their flight path to avoid the German shells.

The 21st Panzer Army's Stug IIIs arrived from Caen, and moved towards LSM, to the cheers of the Heer artillery, who found that the clever Tommies stayed well out of reach of both the Nebelwerfers and LeFH18 fieldguns. The ruins of LSM also prevented the 88mm guns from drawing a bead on the tanks on the beach.

To relieved grins the 21. Pz Div started moving down the road towards the beaches. This time Allied Aircraft were intercepted on their way in, and did not arrive at the scene of the battle. More smiles from Herr Oberleutnant Rhyn von Rheenen zu Fischer, commanding the Panzer column:


Turn 3 saw the Allies land several more M4 Shermans from LCTs and also  2 Churchill AVRE bunker busters, as well as a Churchill VII onto LSM Beach.

 They made short shrift of the 88 mm Gun emplacement and the 75 tank turret bunker guarding the beach approaches. Both went up in flames. They also carefully stayed out of reach of the rocket launcher range. The Germans in their turn successfully brought up a platoon of reinforcement PzKfw IVs from the direction of Caen, and went hammer and tongs at double time to try and get to the beach head, but it was a very looooong way from the back of the board !


The deadly bunker-busting AVREs

Turn 4 saw the Allies still on the beach, though the beach defenses at LSM had now broken, all that stood between the allies were the trenches of the Ost Truppen of 716. Infanterie Division. Luckily these held, not withstanding another rocket attack by 2 typhoons, this time from the Lion sur Mer side of the beach, clearly to avoid the 37mm AA gun now parked near the trenches. The Allied commander landed more Shermans, and a unit of Wolverines at LSM, ready for the punch that would take them into the town, and beyond to the rocket launcher unit. All that stood between them and that objective was a thin grey line of dug in troops (in bullet proof cover), 3 PzKfw IVs, 2 Pak 40s, and 5 StuGs, who now seemed to be heading towards Ouistraham and the Orne River bridges.


Allied Armour about to crush the entrenched Germans, bunkers burning fiercely as shells start exploding in the German fortifications...but saved by the end of play. 

The sun set all to soon, with the Allies still on the Beaches, and the objectives still in German hands. Technically a victory for the Germans, as the Allies were still trapped on the beaches. Given another turn or two a totally different outcome may have transpired. Pity we had to vacate the hall. Things were just getting interesting...

Tune in again  for part 2 of our 3-part D-Day landing story: Lion-sur-Mer and Hermanville.

What did Herr General Oberst learn?
1. When you have artillery dug in to attack a beach, make sure that they are within reach !
2. We were limited in setting up our boards and terrain due to net getting access to the hall the previous night. The terrain was not entirely what I had planned or envisaged as a result, but it worked ok. We lost 2-3 hours' playing time, and couldn't finish our game due to the time constraints this causedt. The day went well though, despite all of this.
3. As an exhibition game it went well, giving several newcomers their first taste of wargaming, and for some a first time away from WH 40K:


Visiting 40K playes getting their first taste of FoW


Break-through on LSM Beach about to happen, tightly clustered armour from an inexperienced  gamer offering a tempting target for the old hands, also now within range of the Nebelwerfers, and 
3 PzKfw are about to come charging around the corner of the double-story holiday villa at right. 
And then the sun set. Drat!


11 May 2014

D-Day at Last: Kapiti Wargames Club Open Day

D-Day: Sword Beach at Kapiti Wargames Club Open Day 2014.


We are barely 3 weeks out from the 70th anniversary of the D-Day Landings on 6 June 2014.

I have been preparing for several months for a large-scale 20mm Flames of War game. The boards are painted and flocked, most of the troops, armour and planes ready, bar some national markings that got left off. Anyhow we loaded the boards and miniatures and headed off to Paraparaumu. Unfortunalely quite a few of our Generals, experienced and otherwise had to pull out either due to business or family commitments.

Les could only make it for the opening volleys of the game, and had to leave early. Others could not make it at all. Suitable replacements were found, never the less, and a great day of gaming was had by all!

Protagonists at Sword Beach
Allied forces attacking Gold, Juno, and Sword Beaches faced

German units of LXXXIV Corps under General der Artillerie Erich Marcks:

716th Infanterie-Division Logo.svg

                                               716.er Inf Div. Insignia              21.er Pz Div Insignia
  • 716th (Static) Infantry Division under Generalleutnant Wilhelm Richter. At 7,000 troops, the division was significantly understrength, and included Ost Truppen, Soviet PoWs who elected to serve in German Uniform rather than go to PoW camps.
  • 736th Infantry Regiment
  • 1716th Artillery Regiment
  • 21st Panzer Division under Generalmajor Edgar Feuchtinger: Included 146 tanks and 50 assault guns, plus supporting infantry and artillery.

British and Canadian zones (The latter landed at Colville, ignored for purposes of this game)

Royal Marines Commandos attached to 3rd Infantry Division move inland from Sword Beach, 6 June 1944
Commander, Second Army (Britain and Canada): Lieutenant General Sir Miles Dempsey

Overall, the Second Army contingent consisted of 83,115 men, 61,715 of them British. The nominally British air and naval support units included a large number of personnel from Allied nations, including several RAF squadrons manned almost exclusively by overseas air crew.

                                                     
                                                       3rd Infantry Corps Insignia
  • British I Corps, commanded by Lieutenant General John Crocker
  • British 3rd Infantry Division: Major General Tom Rennie
  • British 6th Airborne Division: Major General R.N. Gale
  • 79th Armoured Division: Major General Percy Hobart


Facing the landing beaches from the sea: Ouistreham, Lion-sur Mer and farms outside Hermanville-sur-mer in the Distance. The German HQ is situated in the Casino Riva Bella, with the artillery observation tower at left (Allied and German objective) LeFH 18 battery at Hermanville, protected by Flak 38 and Pak 40, Vierling Flak on Halftrack. The road from Hermanville runs down the centre, with the road to Merville leading off the board to the left, Luc -sur-Mer to the right. Heavy MGs on Pillbox and bunker


Luc-sur-Mer, with artillery emplacement (88mm) and 75mm turret bunker (Right), Ost truppen dug in (The weakest link) Heavy MG in pillbox. Road to Lion-sur-Mer and Ouistreham to left, Colville to right.
Nebelwerfer rocket artillery in the fields beyong Luc-sur-Mer (substituting for Wurframen static rockets, as I have none), again supported by an 88 and a 37mm Flak on a halftrack.


Ouistreham harbour and fuel Deport (Objective 2) Protected by Light (bipod) and heavy (Pillbox) MG, 20mm twin AA gun  and Flak Vierling, Ost Truppen of 716 Div.


Rockets at the ready, some Ost Truppen to protect the artillery, and the Luftwaffe half-heartedly manning their 88mm Flak


Heer (Wehrmacht) Artillery. They accounted for more Allied casualties in WW2 than all the Tiger tanks put together. In this case LeFH18 (Light Field Howitzers) 105 mm guns.


The Guns of Merville Battery: Objective 3: 6th Airborne: Parachute brigade


Pegasus Bridge (Orne River): Objective 4: 6th Airborne: Air landing Companies 


22nd Dragoons Sappers (Demolition teams) are the first to land


RAF supplying areal support with Hawker Typhoons. Nick, the Supreme Allied commander rains rockets on the dug in Germans of  716. Infaterie Div.


AVRE Bunker-busters, Hobart's "Funnies" arrive at long last to swiftly clear the defenses at Luc-sur-Mer


LCVPs and DUKWs landing more sappers at Lion-sur-Mer. Unfortunately for them within range of the Nebelwerfers and the heavy machine-guns


Stugs of the 21. Panzerdivision arrive via Hermanville en route to Lion-sur-Mer, and Ouistreham


Yours truly deploying the 21.Pz Division Stug platoon


Sherman wade ashore near the Casino


The second wave of Allied Commanders achieve a break-through at Luc-sur-Mer. The Allies suffered an unusually high rate of casualties amongst both commanders and field officers. 
Supreme Commander Nick urging his generals to increased efforts. He ascribed the high rate of loss of field officers to the Germans being instructed to pick out the British officers.


Hobart's funnies, Shermans and Wolverines pouring from assaulting landing craft and into the gap created by the Dragoon Sappers, but too little, too late ?

Strange how games and history often reflect what actually happened given a well written rule set.
The Allies knew that the Germans would be a hard nut to crack!
Full Batrep to follow...


Generals Repose: Nick and Sam havin' a break at the end of the day

Last prep before D-day

Invasion preparations for D-Day


Really just a quick post of the boards and some prepping taking place prior to yesterday's D-Day Sword Beach Invasion


Hemmbalk and sandbag production line


Tobruk pits, signs and telegraph posts, Czech Hedhogs taking shape


I have not modeled an aircraft since 1981, so this was quite an interesting experience. My skills have improved, but I still struggled with getting those invasion stripes right on an odd-shaped  fuselage! (almost pear-shaped in cross section)
Purposely left the tail of the Horsa detachable, as to reflect Airlanding platoons and their equipment being unloaded after the landing


A river (and a canal) flows through it: Making rivers

Sword Beach: Lion/Hermanville -sur-Mer and Luc-sur-Mer taking shape.
21.Panzer Division inspecting the building work on the observation tower at the (as yet unbuilt) Casino at Riva Bella


Harbour inlet to Ouistreham, Pegasus Bridge taking shape, as does the Orne River Canal and lock