16 April 2014

Diversion from D-Day: ANZAC Day, Gallipolli and Delville Wood

ANZAC DAY: Remembering those who have fallen: 

WW1 and Delville Wood


ANZAC day is the marking of a Day of Remembrance in Australia and New Zealand.
2014 marks a century since the outbreak of hostilities that led to the Great War

ANZAC particularly remembers the fateful events of Gallipoli, and the fruitless waste of young lives.


I too have paused to reflect on WW1, and the waste of lives, with events that still touch us a century later.

In South Africa the equivalent of NZ/Au's Gallipoli is Delville Wood.

Delville Wood was SA's first taste of the horrors of modern warfare. The South African Brigade took part in the Somme Battle, and in a refrain that became too familiar in battles to follow (El Alamein, Sidi Regez, etc) colonial troops were thrown into the breach of the European powers' battles, in this case, suffering up to 80% casualties. Here is there story: 


The Battle of Delville Wood (14 July – 3 September 1916), was an engagement in the 1916 Battle of the Somme in the First World War. It took place between the armies of the German Empire and allied British and empire forces. Delville Wood is to the north east of the town of Longueval in the Somme in northern France. After the first two weeks of carnage caused by the commencement of the Somme Offensive, it became evident that breakthrough of neither Allied nor German line was likely.

The offensive had evolved to the capture of small prominent towns, woods or features which offered either side slim tactical advantage, observation for direct artillery fire or safety from which to launch further attacks.

Delville Wood was one such feature, making it strategically important to both German and Allied forces. As part of a large offensive starting on 14 July, General Douglas Haig, Commander of the British Expeditionary Force intended to secure the British right flank, while the centre advanced to capture the higher lying areas of High Wood in the centre of his line. Taking Delville Wood was an attempt to secure this right flank. 

The battle achieved this objective and is historically considered a tactical Allied victory. However, it was one of the bloodiest confrontations of the Somme, with both sides incurring large casualties. This tactical victory needs to be measured against the losses sustained,  as well as the fact that the British advance to the north had made only marginal gains by the end of the battle.

The battle is of particular importance to South Africa, as it was the first major engagement entered into on the Western Front by the South African 1st Infantry Brigade, which also contained a contingent of Southern Rhodesians.


Before deployment. Note that steel helmets had been issued. 
A practice that only started in 1916 during the Battle of the Somme.

The casualties sustained by this Brigade were of catastrophic proportions, comparable to those encountered by Allied battalions on the first day of the Somme. On the Western Front, units were normally considered to be incapable of combat if their casualties had reached 30% and they were withdrawn once this level had been attained. 

The South African Brigade suffered losses of as high as 80%, yet they managed to hold the Wood as ordered. This feat has been described as "...the bloodiest battle hell of 1916."

The South African Brigade
Background

The political situation in South Africa in 1914 was very different to the other nations of the British Empire.

Canada had been obtained from the French in 1763 and Australia and New Zealand had been colonised without any great interference from rival empires (Nobody was, of course was much interested in what the actual indigenous inhabitants thought about the process. The European powers were bringing them civilisation, after all;  whilst taking away anything of value  that their land had to offer...)

The Union of South Africa was only four years old, and had not long since finished a bitter war between the British and the Boers (1899-1902).

There was not a great deal of desire amongst either the Boer ( Dutch extraction) or the African population of SA to rush off and defend Great Britain which had, within living memory, been responsible for the deaths of thousands of people.

However, General Louis Botha,  a former commander of the Boers, led the Union Defence Forces on a campaign into German South West African in September 1914. This was rapidly brought to a successful conclusion. The South African forces were having a harder time in German East Africa, where they were confronted by General Paul Von Lettow-Vorbeck (Who was still leading the dance, when the war in Europe came to an end).

In theory, South Africans, though liable for military service as British subjects, were not required to serve overseas. This technicality was worked around in April 1915 by the simply asking for volunteers.

Enough men came forward to form the 1st South African Infantry Brigade under Brigadier General Tim Lukin. The Brigade, was made up of four regiments:

1st South African Infantry (Cape Province)
2nd South African Infantry (Natal and Orange Free State)
3rd South African Infantry (Transvaal and Rhodesia)
4th South African Infantry (South African Scottish)


Arrival in Marseilles, with the 4th SAI mascot in tow

It numbered 160 officers and 5,468 other ranks when it arrived in England in November 1915.

After spending some time in Egypt the Brigade returned to France on 20th April 1916, destined for the Western Front where it was attached to the 9th (Scottish) Division.

It would serve with distinction throughout the war and remained with the Scots until the summer of 1918 when it had been so depleted by fighting that it had to be recalled to England and re-formed. It was back in France in September 1918 but this time with the 66th (Lancashire) Division.

Delville Wood: The Great Slaughter of 1916

Troops on the Western front compromised Kitchener's 'New Army':  Territorial forces,  from all parts of the British Empire. While steel helmets were issued to most soldiers, a "luxury" first introduced at Loos, replacements had little training and were without any combat experience. Soldiers were "mostly civilians in khaki, hastily trained and thrown into battle" - lives wasted.The Battle of the Somme commenced on the 1st of July 1916.

It was a " fierce and complex Battle" involving many units and no small task. A "dreadful slogging match and conditions within the wood were appalling, with death and danger everywhere". The artillery had "reduced the trees to a morass of splintered wood making movement virtually impossible. It was fought at close hand with bombs and bayonets." Mud and water covered bodies; many still remain in the wood today.

"The wood had to be cleared of Germans before any attack could be launched on the formidable and notorious, German Switch Line." The orders - Take it "at all costs": It took over 6 days and 5 nights.
As with many other attacks, the wood was heavily shelled by Allied artillery before infantry troops went in.

The southern sector of the wood was quickly cleared of Germans. The officer overseeing the attack, Tanner, reported back to his headquarters in the evening of the 15th that all of the wood had been taken except the northwest near the town of Longueval.

In fact, the South Africans were in a very precarious position as they faced over 7,000 Germans. The artillery shelling had pushed over trees and exposed their roots. This made it very difficult to dig trenches. The South Africans were not only up against a larger force but had to survive in ‘trenches’ that had little depth and gave minimal protection especially against German artillery attacks.

The terrain all but dictated that most of the combat within the wood was hand-to-hand fighting and casualties were high. The terrain would have made it difficult to move the wounded back to a medical station. However, such was the ferocity of the fighting in this phase of the battle that for every one South African wounded, four were killed. The South Africans fought within the wood until July 19th when they were relieved. Their casualties were some of the worst seen on the Western Front.

(I intend to post a fuller description of the battle later this week.)

Captain S. J. Worsley, MC:

“Every semblance of a trench seemed full of dead-sodden, squelchy, swollen bodies.  Fortunately the blackening faces were invisible except when Verey lights lit up the indescribable scene.  Not a tree stood whole in that wood. Food and water were very short and we had not the faintest idea when any more would be obtainable.

We stood and lay on putrefying bodies and the wonder was that the disease (dysentery) did not finish off what the shells of the enemy had started. There was hand-to-hand fighting with knives, bombs (grenades) , and bayonets; cursing and brutality on both sides such as men can be responsible for when it is a question of "your life or mine"; mud and filthy stench; dysentery and unattended wounds; shortage of food and water and ammunition.”
  
A German officer who fought at Delville Wood described it as:

“Delville Wood had disintegrated into a shattered wasteland of shattered trees, charred and burning stumps, craters thick with mud and blood, and corpses, corpses everywhere. In places they were piled four deep.”

The Germans responded to the attack by shelling areas of the wood captured by the Allies. At its peak it is thought that 400 German shells landed in Delville Wood every minute. Combined with frequent raid rain, the wood was not only churned up with regards to trees but it also became a quagmire.


The Springbok mascot survived the carnage

The fighting for the wood continued into August. Skilfully placed German machine gun posts and well-hidden snipers greatly hindered any Allied advance through the wood. Once the South Africans had been relieved, men from the Royal Welsh Fusiliers, the Royal Berkshires and the 1st King’s Royal Rifle Corps tried to take the wood. However, like the South Africans, they faced a heavily fortified enemy that was supported by very accurate artillery fire. They in turn were relieved and replaced by the 17th Northern Division who were relived by the 14th and 20th Light Division.


It is thought that German casualties matched Allied casualties but loss of records makes this hard to verify. The South Africans had 3,155 men at the start of the attack and suffered 2,536 casualties by the time they were relieved. This represented a loss of 80% - killed, wounded and missing. 104 officers out of a total of 123 were killed, wounded or missing – nearly 85%.


The lucky few: Relieved survivors being withdrawn

Four Victoria Crosses were awarded for outstanding bravery:

Private William Faulds (SA)
Sergeant Albert Gill (UK)
Private Albert Hill (UK)
Corporal Joseph Davies (UK)

Delville Wood was only finally fully cleared of Germans on September 3rd 1916.

Because of German counter attacks, this whole area was an awful 'killing field' - "flies rose in dense black clouds round us… exhaustion did what shell-fire failed… we collapsed in our trenches, spent in body and worn out in spirit… the task set was too great for us".

The Germans recaptured Delville Wood in March 1918 as part of their Spring Offensive.

During the Allies advance after the Spring Offensive had failed, the 38th Welsh Infantry Division fought for it and captured the wood in August 1918.


Losses

South African:
  • Strength at start of battle: Officers 123 Other ranks 3032
  • Killed 457
  • Wounded 1476
  • Unaccounted (Missing) 483
  • Total casualties: 2536
  • Unit strength at close of battle: Officers 19 Other ranks 600


Both the Allies and German forces sustained extremely heavy losses, the 9th Division had lost 314 officers and 7,203 other ranks between 1 and 20 July. Details of the German losses are scarce, especially those of the Prussian divisions which played an important role in the battle, due to the loss of archive documents caused by the Allied strategic bombing campaign of World War II—particularly the raids on Potsdam in 1945. The German 26th Regiment (the equivalent of an Allied Brigade) which had been at a war establishment strength on 13 July had only 10 officers and 250 other ranks after the battle.

The question has frequently been asked as to why the South Africans remained in the wood only to be slaughtered by artillery fire. This was not the intention of the commanders: 
Henry Lukin00.jpg

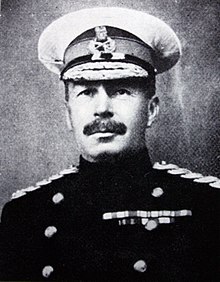
Henry Lukin

Brigadier-General Lukin’s post battle report stated that "My intention was to thin out the troops in the Wood as soon as the perimeter was seized, leaving the machine-guns with small detachments of infantry to hold it. The enemy, by launching counter-attacks at once, prevented this intention being carried out and Lieut-Col Tanner reported that he required all the men under his command to hold off the enemy."

Losses sustained by the South African Brigade may have frequently been over-stated. When considering the claimed South African total casualties, a number of factors need to be considered:

Casualties which had been sustained by the South African Brigade at Bernafay Wood and Maricourt before 14 July (the date of entering Delville Wood) are frequently, erroneously added to the Delville Wood casualties;
Casualties sustained by the 1st and 4th Battalions in Longueval on 14 July are also sometimes incorrectly added to the Delville Wood totals;
Of the three officers and 140 men who left Delville Wood on 20 July, less than half had entered the wood on 14 / 15 July, and were replacement troops which had been sent in between 16 and 20 July. According to Col. Thackeray, a total of 199 reinforcements had been received in the wood.

The Brigade headquarters and staff had not deployed into the wood, and as such the total brigade staff at the start of the battle were not necessarily all in the wood.

Additional troops (in addition to the 3 officers and 140 men who had withdrawn on 20 July) reported to Happy Valley for the muster parade of 21 July. So did the Brigade and Machine Gun Company staff.


D-Day The quickening: AS51 Horsa lands on my Workbench

The Quickening: Airspeed 51 Horsa Glider arrives


Over the weekend I took some time to progress the landing zones for the D-Day games. At lunch-time I discovered that the Airspeed Horsa 51 glider for the airborne part of the game had arrived. Yay!


Transport for the 6th Airborne arrives


Progress Report:

The Playing Board:
The boards: The harbour of Ouistreham and the beaches at Luc-sur-Mer and Hermanville -sur-Mer have been created and painted,  the board depicting harbour, lock and canal,  rocky and sandy shores, deep and shallow water, the inter-tidal zone and the sea wall; as well as the villages and grassy hinterland.

Tank traps and concrete bunkers, hedgehogs and dragons teeth - all ready to roll

Buildings: The concrete blocks for much of the harbour and German  shore battery are made and painted. The buildings for most villages and the harbour installations are ready, or in the post.

 I still need to build the observation bunker at Riva Bella.
The Pegasus Bridge is under construction, and the canal bridge is ready.

Vehicles and planes
I have built two DUKWs and a Higgins Boat, as well as an LCT. Probably need another one of each at least. An RAF launch is half constructed.
The British armoured squadrons are ready to roll, as are the soft-skinned vehicles. Still need to attend to Hobart's Funnies- need 2 x ARVEs and Sherman Crabs

As for the German side- "Alles fertig und in ordnung!" (Ready and in order)


9 April 2014

Sword Beach: Ouistreham: The Plot thickens

D-Day Wargaming ahead: Kapiti Wargames Club Open Day

D-day gaming coming up on 10th May 2014:


So I have been plotting and planning on the D-Day gaming ahead. I have drawn up the plan (not to scale) of the game board, with areas representing the actual landing beach, the German Defenses and the villages of Collville -, Luc- and Hermanville-sur-Mer, and the small harbour at Ouistreham, the Orne river and Canal, the Orne river bridge, and the bridge now known as Pegasus Bridge. And the Merville Battery thrown in for good measure.

Historical Background:
Ouistreham was the key to the Allied attack at Sword Beach, as it was the gateway into the Orne, the Caen canal, and the cross-road hub town of Caen. Seizing control of the town would give the Allies a small port (nowhere near the size needed for sustaining supply lines, but useful, none-the-less), and control of the river and canal bridges so as to prevent German armor from hitting their left flank.

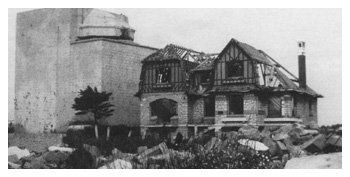
The Germans, needless to say, knew how important the town could be and made preparations.  The casino was retrofitted with a bunker in the basement and gun that could hit ships at sea as well as targets closer in. Other fortifications went in as well, and in a very flat area, a towering bunker designed to withstand bombs, artillery fire, and even gas/chemical attacks, was built behind an existing house to help disguise it a bit.  This was not a gun bunker - it was far more dangerous than that.  It was an observation bunker with a very accurate rangefinder for the time.


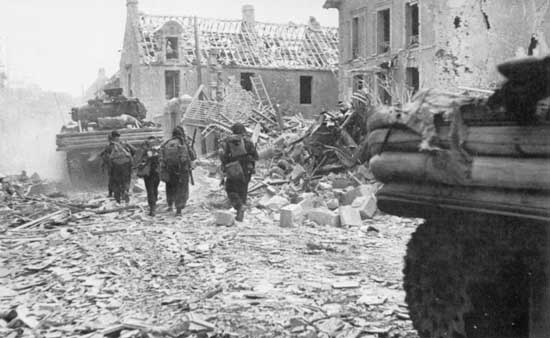
Keiffer Commando forces in house-to-house fighting in the advance towards Bella Riva. 
Duplex Drive Sherman leading the spear-head

Not only did the bunker survive the day, but the story of how it fell brings a smile to the face.  On D-Day, the bunker was bypassed after troops came under machine gun fire and grenade attack when approaching it. After the battle the structure fell silent, and it was presumed abandoned. On 9 June 1943, a Lt. Bob Orrell of the Royal Engineers was tasked with assessing and cataloging construction materials left behind in the Ouistreham area by the retreating Germans. On inspection he noted that the bunker was closed up,  and apparently locked from the inside.  He was ordered to investigate further, so he went back with a mobile crane and three assistants.

Observation Bunker 

The door was still locked, so he tried explosives: To no effect. They then tied other means of forcing the door, but finally went back to (more) explosives and succeeded in forcing the door open.

It was then that a voice called down in perfect English that it was "Okay, come on up !"  To which the good Lt. responded that he could not fly, and whoever was up there should come on down.  To his amazement 53 Germans descended and surrendered to a force of one junior officer and his three assistants.

The German HQ housed in the casino was not set back from the water, on a hill, as portrayed in the movie The Longest Day.  It was in fact set effectively on the beach with a ditch/canal in front.  The Keiffer (Free French) Commando forces did indeed take it; and also destroyed it, and today a new casino sits on the site.


One thing to consider about the troops making the beach assault though, is them having to cross as much as  300 meters of wet sand with absolutely no cover of any kind.  Because the invasion was scheduled for a period of extremely low tides, many troops coming in had to charge across up to 300 meters of open beach before hitting the edge of the beach and finding any potential cover.


Some inspiration from fellow gamers: Terrain and toy soldiers (clicky)


We plan to use the FoW rules from the D-Day Minus One and D-Day books, effectively having 3 games in one:

Thus a large table:

Allied Targets:
1. Beach assault, overcome German beach defenses, take the villages, including Oistreham; open the road towards Caen  - Beach Assault rules
2. Commando Assault: Take Ouistreham fishing harbour, knock out  defenses, Casino and  Riva Bella , link up with Airborne assaults at bridges/ Merville Battery - Beach assault or seaborne commando assault rules
3. Airborne Assault: Parachute and glider landings on Pegasus Bridge, Orne River bridge and Merville Battery

German Targets:
1. Prevent Allies from taking Ouistreham and beach (-sur Mer) villages, the German HQ in the Casino Riva Bella ; and establishing a foothold on the continent
2. Protect road to Caen, including bridge access across Orne river and canal
3. Protect Merville Battery

To make things a bit more interesting we have decided to throw in a few historical wildcards. At the beginning of the game we'll roll to see if any specific conditions may affect the way that the game plays out:

Allied Wildcards:
Fortune cards:
  • Successful  preliminary bombarding: Roll D6: On roll of 5 or 6 Allied player gets additional round of preliminary shelling , 3 or 4 re-rolls on fails to wound, 1 or 2 re-roll fails to hit  
  • Mill pond: Weather and tide does not affect landing,  +1 to all rolls caused by weather effects
  • Partisan attack: Place one infantry section within 24 inches, but more than 12 inches away from German infantry troops. These count as being in ambush, Conscripts, fearless
Misfortune cards:
  • Wild weather: Weather and tide affects landing severely,  -1 to all rolls caused by weather effects
  • Beach defenses effective: - Roll D6: On roll of 5 or 6 Allied player has to roll for every landing craft or tank as it gets into the landing zone: A rolls of 1 makes vessel capsize/tank flood, 2  or 3 stranded until next turn (caught up in obstacle but freed, can land cargo next turn); 4 or 5 delayed (can attempt landing again next turn) ,  6 delayed and return to landing ship (sea zone) (can attempt again next turn)  
  • Luftwaffe and Kriegsmarine interception:  Roll D6: 1-3:  Luftwaffe available Roll again- determines level of availability. 4-6;  Kriegsmarine (U and S-boats) Same rule, but can only target landing craft (No extra cost to axis player)
German Wildcards:
Fortune cards:

  • Luftwaffe cover available: Roll to see level of cover (no extra cost)
  • The Fuhrer's Blessing: Rommel takes command (All Axis troop morale +1, to max fearless veteran; Armour support arrives on  D6 Roll: 1-2 (turn 4) 3-4 (turn 3) 5-6 (turn 2)
  • Hitler's Fire-brigade: SS Panzer Division and Panzer Lehr become available D6 1-3 (turn 4) D6 4-6 (turn 3)

Misfortune cards:
  • Partisan attack: Allied player places one infantry section within 24 inches, but more than 12 inches away from German infantry troops. These count as being in ambush, Conscripts, fearless
  • Turncoat Osttruppen: Russian POW troops: First contact: Roll Morale test: D6. Roll for every unit: On roll of 1 surrender without fight, roll of 2: -1 to morale; 3-6 morale per book. German player can motivate using German Oficer, sacrificing one platoon unit a-la- USSR Commisar rules.
  • Caught pants down: All troop morale -1 for first 2 rounds,  Armour support arrives on D6 Roll: 1-2 (turn 4) 3-4 (turn 3) 5-6 (turn 2) German troops cannot make storm trooper moves first 2 turns. 


1 April 2014

Sword Beach: D-Day Gaming: The History reviewed

Sword Beach Landings on D-day


I've been reading up on D-Day with regards the Sword Beach Landings. I have chosen this landing for our D-Day Commemorative game mainly because the bulk of my 20mm  infantry models are British, and I don't think I'll have enough time to  paint up my US troops. I have enough Airborne and commando models to include the airborne assault. My allied armour has been left without national and unit  identification markings on purpose, so that they can be used on the Eastern front and for US troops as well. I will have to build some Hobart's Funnnies, as I don't have neither Crab or Crocodiles nor AVREs. We will use FoW rules, as my models are based for this rule set.


Sword Beach
SWORD BEACH was the objective of 3rd (British) Infantry Division. They were to advance inland as far as Caen, and line up with British Airborne forces east of the Orne River/Caen Canal. The Orne River bridges had been seized in late at night on the 5th of June by a glider-borne reinforced company commanded by Maj. John Howard. As at the other beaches, British forces penetrated quite a ways inland after breaking the opposition at water's edge. Unfortunately, the objective of Caen was probably asking too much of a single infantry division, especially given the traffic jams and resistance encountered further inland.

1st Special Service (Commando) brigade commanded by Lord Lovat, linked up in the morning with Howard's force at Pegasus bridge on the British left. Fierce opposition from the 2lst Panzer and later the 12th SS Panzer division prevented the British from reaching Caen on the 6th. Indeed, Caen was not taken until late June.

The landing beach
Sword Beach occupied an 8-km stretch of the French coastline from Lion-sur-Mer on the west to the city of Ouistreham, at the mouth of the Orne River, on the east. The area had vacation homes and tourist hotels and restaurants located behind a seawall. It was 15 km) north of the city of Caen. All major roads in this area ran through Caen, and it was a key city to both the Allies and the Germans for transportation and maneuver purposes.

The Germans had fortified the area with relatively light defenses consisting of beach obstacles and fortified emplacements in the sand dunes. For the most part, however, the defense of the beach was anchored on 75-mm guns located at the coastal town of Merville, some 8 km  to the east across the Orne River estuary, and on bigger 155-mm guns located some 32 km east at Le Havre. A few miles inland from the beach were 88-mm guns capable of supporting the machine guns and mortars that were placed in the dunes and villas and that constituted the Germans’ first line of defense. There were also antitank ditches and mines as well as huge concrete walls blocking the streets of the towns. The German 716th Infantry Division—in particular, the 736th and 125th regiments—along with forces of the 21st Panzer Division were in the vicinity and were capable of participating in defensive or offensive operations. To the east, across the Dives River, lay the 711th Division.


Sword Beach lay in the area of landing beaches assigned to the British 2nd Army,commanded by LtGen Miles Dempsey. It was divided by Allied planners into four sectors named (from west to east) Oboe, Peter, Queen, and Roger. Elements of the South Lancashire Regiment were to assault Peter sector on the right, the Suffolk Regiment the centre in Queen sector, and the East Yorkshire Regiment Roger sector on the left. The objective of the 3rd Division was to push across Sword Beach and pass through Ouistreham to capture Caen and the important Carpiquet airfield nearby. Attached commandos, under Simon Fraser, Lord Lovat, had the mission of fighting their way off the beach and pushing some 5 km (3 miles) inland toward the Orne River and Caen Canal bridges, where they were to link up with the airborne forces.

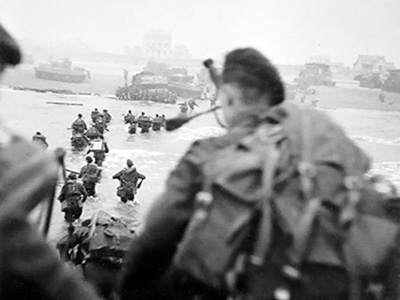
The invading forces landed at 0725 hours on D-Day and were greeted with moderate fire. They were able to put out suppressing fire, and by 0800 hours the fighting was mostly inland. By 1300 the commandos had achieved their most important objective: they had linked up with airborne troops at the bridges over the Orne waterways. On the right flank the British had been unable to link up with Canadian forces from Juno Beach, and at 1600 hours tank forces and mechanized infantry units from the 21st Panzer Division launched the only serious German counterattack of D-Day. The 192nd Panzer Grenadier Regiment actually reached the beach at 2000 hours, but the division’s 98 panzers were halted by antitank weapons, air strikes, and Allied tanks themselves. The counterattack was stopped.


At the end of the day, the British had landed 29,000 men and had taken 630 casualties. German casualties were much higher; many Germans had been taken prisoner. However, for the Allies the optimistic objectives of Caen and the Carpiquet aerodrome were still a long 5 km away.

 
Landings later in the day, once beach defences had been overcome - note the absence of helmets


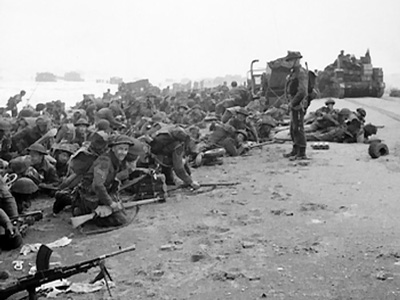
Casualties and AVRE, and Wolverine, not Achilles, as first captioned, on the beach
 (Note lack of muzzle break, therefore not the 17-pounder gun, thanks for pointing that out Wingco Luddite!)

Difference between Wolverine and Achilles M10 Variants

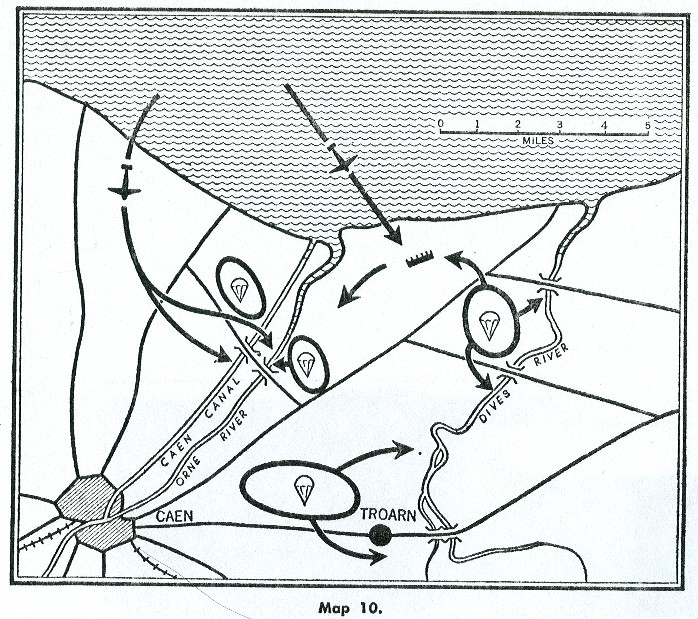
Orne and Dives rivers air-assault zones
Paratroopers from the British 6th Airborne Division, Major General Richard Gale commanding, were to be landed at night onto the left flank of the Normandy Invasion area in order to help isolate the battlefield for the seaborne invasion force that was scheduled to land on nearby Sword Beach at dawn. The drop zones were labeled X, Y, N, K, and V. X and Y were glider landing zones near the two bridges over the Orne River and the Caen Canal. V was a glider landing zone near the Merville battery, and N and K were on the Ranville ridge separating the Orne and Dives rivers.

German forces in the area consisted of elements of the 716th Infantry Division. The dominant defensive position was the battery at Merville, with four guns of undetermined size fortified in hard casemates.

Troops

The objectives of the 6th Airborne were to seize, intact, the critical bridges over the Orne River and Caen Canal near the village of BĂ©nouville, securing vital exit routes for the forces scheduled to land at Sword Beach; to destroy the bridges over the Dives River, thus denying the Germans a route to the invasion area from the east; to hold the dividing ridge between the Dives and the Orne from an expected German counterattack; and, finally, to destroy the Merville battery, which threatened Sword Beach with its big guns.


At 0016 hours on D-Day, gliders containing Company D, 2nd Oxfordshire and Buckinghamshire Light Infantry, commanded by Major John Howard, touched down precisely on target at the bridges. Within 10 minutes and with the loss of only two men dead, the daring coup de main placed both bridges in Allied hands. Howard’s company thus became the first attackers of the Normandy Invasion on French soil and the first unit to achieve its objective on D-Day. The Caen Canal bridge was soon immortalized as Pegasus Bridge, named after the insignia of the 6th Airborne Division.

Pegasus Bridge
Pegasus Bridge

The silencing of the Merville battery fell to Lieutenant Colonel Terence Otway’s 9th Battalion. The 9th, however, had a bad drop, and the attack began with only 150 men of the 750-man force. The daring attack captured the battery at a cost of half the attacking force. The defending Germans paid a terrible price: only 22 men of the 200-man garrison were uninjured.

The rest of the 6th Airborne troopers continued to land throughout the night, although many were scattered. Nevertheless, small parties found one another and managed to destroy five bridges over the Dives.

By morning, as the invasion force rolled ashore on Sword Beach, the left flank of the area was indeed secure. By 1300 hours Howard’s glider troops at the bridges had connected with elements of Lord Lovat’s 1st Commando Brigade. As evening fell on June 6, the 6th Airborne was generally in place and had achieved its objectives.

Info from Encyclopaedia Brittannica and various internet sources. Happy to reference at request. No copyright infringement intended