Showing posts with label Airborne. Show all posts

1 October 2014

Operation Market Garden (Part 2)

Operation Market Garden (Part 2)

Field Marshal Montgomery's goal was to force an entry into Germany over the Lower Rhine. He wanted to circumvent the northern end of the Siegfried Line and this required the operation to seize the bridges across the Maas (Meuse) River and two arms of the Rhine (the Waal and the Lower Rhine) as well as several smaller canals and tributaries. Crossing the Lower Rhine would allow the Allies to encircle Germany's industrial heartland in the Ruhr from the north. It made large-scale use of airborne forces, whose tactical objectives were to secure the bridges and allow a rapid advance by armored units into Northern Germany.


Several bridges between Eindhoven and Nijmegen were captured at the beginning of the operation but Gen. Horrocks' XXX Corps ground force advance was delayed by the demolition of a bridge over the Wilhelmina Canal. This caused an extremely overstretched supply line, and failing to capture the main road bridge over the river Waal before 20 September.

The Allied Airborne Army comprised of four divisions; two British and two American. Linked to it was the Polish Independent Parachute Brigade lead by Major-General Sosabowski.

The two most senior American commanders were Major-General Gavin of the 101st Division and Major-General Maxwell Taylor of the 82nd Division. Both men were knowledgeable in airborne warfare. The British First Airborne Division was lead by Major-General Urquhart. He was an unusual choice to lead the Airborne Division as he had never parachuted before, never participated in a glider landing and got air sick. He, himself, expressed his surprise when he was appointed commander of the division.

Robert Urquhart

The First Airborne Division had not taken part in D-Day. It had been kept in reserve and had remained inactive after June 1944. A number of planned operations had been cancelled at the last minute because they were not needed due to the success of the British armoured columns on the ground. By September 1944, the First Division was "restless, frustrated and ready for anything". Urquhart said that it was:"Battle-hungry to a degree which only those who have commanded large forces of trained soldiers can fully comprehend."

The First Division was given the task of capturing the bridge at Arnhem and holding it. The 101st Division was to capture the Zuid Willems Vaart  Canal at Veghel and the Wilhelmina Canal at Son. The 82nd Division was to capture the bridges at Grave and at Nijmegen.

The attack had to be planned in just six days. Urquhart's First Division faced two major problems; the shortage of aircraft and the belief that the bridge at Arnhem was surrounded by anti-aircraft guns that would make a landing by the bridge itself too difficult.

The Americans were given the priority with regards to aircraft. The capture of the bridge at Arnhem would be pointless if the Americans failed to captured their targets. Therefore, the Americans would be carried to their targets in one lift whereas the attack on Arnhem would be done in three separate lifts during the day. Any night time landings were considered too dangerous.

This posed a major problem for Urquhart. His first force would have the element of surprise and, if the German resistance was minimal, would hold the bridge and secure any landing zones for the gliders. However, any subsequent landings would be after the Germans would have had the time to get themselves organised.

Intelligence reports also showed that the flak around the bridge itself was heavy. This was confirmed by RAF bomber crews who encountered the flak on their regular flights into Germany. Urquhart decided to make his landings to the west away from the bridge even though he knew that this was a risk. If the German resistance was stronger than anticipated, there was the chance of the first landing not even getting to Arnhem Bridge and taking out the flak.

British Intelligence reports indicated that the German presence in Arnhem was minimal. It was believed that the Germans only had six infantry divisions in the area with 25 artillery guns and only 20 tanks. German troops, in an Intelligence report of September 11th, were said to be "disorderly and dispirited". A similar report was made on September 17th.


Arnhem, the Bridge too Far:


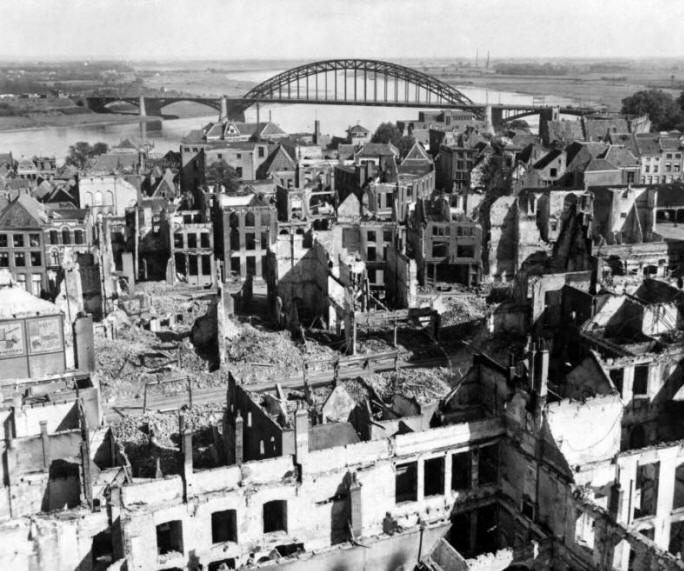
At Arnhem, the British 1st Airborne Division encountered far stronger resistance than anticipated. In the ensuing battle, only a small force managed to hold one end of the Arnhem road bridge and after the ground forces failed to relieve them, they were overrun on 21 September.

The rest of the division, trapped in a small pocket west of the bridge, had to be evacuated on 25 September. The Allies failed to cross the Rhine in sufficient force and the river remained a barrier to their advance until offensives at Remagen, Oppenheim, Rees and Wesel in March 1945. The failure of Market Garden ended Allied expectations of finishing the war by Christmas 1944.

Arnhem Timeline


September 17th 1944Operation Market Garden began. The British landing near Arnhem is met by heavy German resistance. The American 82nd Division captured its targets at Waals but met heavy resistance at Nijmegen.
September 18th 1944A German counterattack stopped the Americans entering Nijmegen. The British landing zone near Arnhem was heavily attacked by Bittich's SS in an effort to stop further British landings.
September 19th 1944The leading elements of the British 30th Corps reached the Americans at Nijmegen but all efforts to break through to the British at Arnhem fail.
September 20th 1944The bridge at Nijmegen was captured by a combined US/UK assault.
September 21st 1944The British paratroopers defending the northern end of the bridge at Arnhem were heavily attacked. Those British troops who did not get through to Arnhem formed a defensive barrier west of Oosterbeek.
September 22nd 1944The advance of British tanks to relieve Arnhem was delayed  as a result of German attacks.
September 23rd 1944Attempts by the Poles and troops of 30th Corps to cross the river at Arnhem failed.
September 25th 1944The surviving British troops were evacuated but nearly 3000 were captured. Over 1,200 British troops were killed in a plan that went a 'bridge too far.'

Reports from the Dutch Resistance indicated beforehand that SS units had been seen in the Arnhem area. The First Airborne Division was only given this information on September 20th - three days after the attack on the bridge at Arnhem had begun.

Operation Market Garden began on Sunday morning, September 17th, 1944. Luftwaffe fighters bases had been attacked as had German barracks based near the drop zones. 1,000 American and British fighter planes gave cover as the gliders and their 'tugs' crossed the North Sea and headed over mainland Europe. The greatest fear was from flak and Intelligence estimated that the loss of gliders and transport craft could be up to 40%. As it was, very few of the 1,545 aircraft and 478 gliders were lost.

The 82nd Division landed without major problems around Grave and Nijmegen. The 101st Division was equally successful and by nightfall, the Americans and British armoured corps had met up in Eindhoven.


However, by the 18th September, fog had played its part. The glider and tug flights that were due to cross on the second day could not do so. This affected the 82nd Division in that Gavin had fewer men to attack the bridges at Waal, especially the road bridge that had held out for three days during the German attack on Holland in 1940. This bridge only fell in the evening of Wednesday 20th after a combined American/British attack. With this bridge captured, the 30th Corps armour could race towards Arnhem to relieve Urquhart's First Airborne Division there.

At Arnhem, the British met much stiffer opposition than they had been lead to believe. The IX th and X th SS Panzer Divisions had re-grouped at Arnhem - as Dutch resistance had warned. Both groups comprised of 8,500 men lead by General Willi Bittrich.

These were not the poorly equipped German garrison troops,  low in morale, that British Intelligence had claimed were stationed at Arnhem. Bittrich - a highly regarded general in the Waffen SS - sent in the IX SS Division to the British landing zones immediately. The X Division was ordered to Nijmegen to stop the 2nd Army group advancing on Arnhem. Bittrich was confident of success:

"We shall soon be able to discount the threat of the British north of the Neder Rijn. We must remember that British soldiers do not act on their own initiative when they are fighting in a town and when it consequently becomes difficult for officers to exercise control. They are amazing in defense, but we need not be afraid of their capabilities in attack." - Bittrich.

The men from the IX th Division quickly created a formidable defensive line to stop the British advancing to Arnhem. The British faced a number of serious problems in the landing zone. Nearly all the vehicles used by the Airborne Reconnaissance Squadron were lost when the gliders carrying them failed to land. Therefore the advance into Arnhem itself was delayed but also had to be done almost entirely on foot. The job of the Reconnaissance Squadron was to move off in jeeps etc. in advance and secure bridges and roads. This they could not do after the loss of their vehicles. The maps issued to officers also proved to be less than accurate.

The British paratroopers quickly came under German fire. Only the 2nd Battalion lead by Lt. Col. Frost moved forward with relative ease but even they were occasionally halted by German fire. Frost's men were the most southerly of the British units and the Germans had covered their route to Arnhem less well than the other routes the British were to use.

When Frost got to the bridge at Arnhem, he only had about 500 men. He secured the northern end of the bridge and the buildings around it but he remained heavily exposed to a German attack across the bridge as the British had failed to secure the southern end of the bridge. Around Arnhem, British troops, engaged in combat with the SS, took heavy casualties. By now, the Germans were being reinforced with SS crewed Panzer VI Tiger tanks.

Despite being short of ammunition and with no food or water, Frost's men continued fighting.

A German who fought in the final battle for the bridge wrote:

"(The fighting was) an indescribable fanaticism...and the fight raged through ceilings and staircases. hand grenades flew in every direction. Each house had to be taken this way. Some of the British offered resistance to their last breath."

The 2nd Army failed to reach Arnhem. In the final drive - just 10 miles - from where the 2nd Army was to Arnhem, the SS fought with great skill seriously delaying the forward momentum that the 2nd Army had previously developed. Those British troops who remained in the Arnhem area were caught in land that the SS called 'The Cauldron'. A decision was made to withdraw. Those soldiers that could be evacuated were but many wounded were left behind.


In all, over 1,200 British soldiers had been killed and nearly 3,000 had been taken prisoner. 3,400 German troops had been killed or wounded in the battle.

Why did the plan fail?

  • The speed with which Bittrich organised his men and his tactical awareness were major reasons for the German victory. British Intelligence had ignored Dutch Resistance reports that SS units were in the region. This was a fatal mistake.
  • When the paratroops landed they found that their maps were inaccurate regarding the layout of the roads in the Arnhem area. 
  • Another major problem was that the radio sets issued to the men only had a range of 3 miles and thus proved to be useless when the various segments of the British army in the area were spread over 8 miles. Lack of communication proved a major handicap for commanders on the ground who rarely knew what other commanders were doing or planning. 
  • Landing was also planned to be spread over three days, The 1st Airborne Division was never up to full strength, and the element of surprise was lost


5 June 2014

D-Day Minus One, the paratroops go in (again, for one veteran)

Paratrooper jumps again: 70 years after D-Day

A former U.S. Air Force C-47 Skytrain aircraft (bottom) flies alongside a C-130J Super Hercules aircraft assigned to the 37th Airlift Squadron over Germany in this handout photo taken May 30 and released June 3, 2014. REUTERS/U.S. Air Force/Staff Sgt. Sara Keller/Handout via Reuters

Normandy, France (CNN) -- Jim "Pee Wee" Martin acted like he'd been here before, like jumping from a plane is as easy as falling off a log.

Maybe that's because he had -- 70 years ago.

"I'm feeling fine," Martin told reporters moments after landing in a French field. "... It was wonderful, absolutely wonderful."
Martin was part of the U.S. 101st Airborne Division that parachuted down over Utah Beach in their bid to retake France and, eventually, the rest of Europe from Nazi Germany. They actually touched down in enemy-controlled territory a night before what's referred to now as D-Day.

His jump Thursday in the same area was different and -- despite his being 93 years old now -- a whole lot easier.
"It didn't (compare)," Martin said, "because there wasn't anybody shooting at me today!"

Every year, every day it seems, the number of surviving World War II veterans like Martin dwindles. He estimates there are only a few dozen members of his unit who took part in the now historic D-Day invasion who are still around.
It's ironic, in a sense, because Martin was among the oldest of his bunch in June 1944 -- at 23 years old -- surrounded by others who were mere teenagers.


Together, they parachuted onto France's northern coast in the dark of night not knowing what awaited them. Whatever it was, it would not be friendly or easy, they expected.

"Everybody (was) scared all the time, and if they tell you anything differently they are full of crap," the former paratrooper recalled. "But you just do what you had to do regardless of it. That's the difference."
And they didn't stop. According to a Facebook page he regularly updates, Martin fought for 43 days as part of the Normandy campaign before moving onto invade Holland, fending off Nazi fighters during the Battle of the Bulge and finishing off by taking Berchtesgaden, site of Hitler's "Eagle's Nest" redoubt in the German Alps.

None of it was easy, but Martin insists, "I don't ever have flashbacks. Never. Nothing ever bothered me."
All these years later, he has become a celebrity of sorts -- as evidenced by a mob of reporters who greeted him after his parachute landing Thursday. Martin says he feels "kind of humbled and embarrassed at the adulation because I don't feel we did anything that we weren't supposed to do or anything exceptional."
He adds: "We just did what we trained to do."


On Norman soil again...

Seven decades later, Martin did it again -- not fighting a bloody war but at least reliving his role in a military campaign that changed the course of history. Others joined him in this now daytime jump, though he was the only one from his generation.
This time, he said that he wasn't scared because, "once you get in the plane, you forget everything." Bored would be more like it.

As he told reporters afterward, "To tell you the truth, riding around in the plane is boring. It's when you get off the plane, that's when it gets exciting ... But there's no fear to it. It's just something you do."

​Veteran 101st Airborne paratrooper Pfc. Jim "Pee Wee" Martin reminisces about D-Day at the National Museum of the Air Force in Dayton, Ohio.: ​Veteran 101st Airborne paratrooper Pfc. Jim "Pee Wee" Martin reminisces about D-Day at the National Museum of the Air Force in Dayton, Ohio.

Martin admitted that he was motivated by "a little bit of ego, (to show that) I'm 93 and I can still do it."
"And also I just want to show all the people that you don't have to sit and die just because you get old," he added. "Keep doing things."
Among those things he'd like to do is another jump in the same plane, one year from now.

"If I come back next year, I'll make a jump next year. You can bet on it."

28 May 2014

D-Day Part 4: Gliders and Parachutes: Pegasus Bridge and the Orne canal: Airborne assault

Re-fighting D-Day: Part 4: 

Airborne landings at Pegasus (Benouville) Bridge over the Orne Canal; and Orne River (Horsa) Bridge, Ranville, Normandy 


Operation Deadstick: D-Day Minus 1 or the Opening Shots, as you wish:

Historical background:

Orne bridges
Pegasus Bridge is a bascule bridge (a type of movable bridge), built in 1934, that crossed the Caen Canal, between Caen and Ouistreham, in Normandy, France.


Also known as the BĂ©nouville Bridge after the neighbouring village, it was, with the nearby Ranville Bridge over the river Orne, a major objective of Operation Deadstick, part of Operation Tonga in the opening minutes of the invasion of Normandy. A glider-borne unit of the British 6th Airborne Division, commanded by Major John Howard, was to land, take the bridges intact and hold them until relieved. The successful taking of the bridges played an important role in limiting the effectiveness of a German counter-attack in the days and weeks following the invasion. Lord Lovatt's Commandos were to Land at Lion-sur-Mer and advance via Ouistreham to relieve the airborne troops. The


In 1944 it was renamed Pegasus Bridge in honour of the operation. The name is derived from the shoulder emblem worn by the British airborne forces, which is the flying horse Pegasus.


Pegasus Bridge and the structure that replaced it in 1994 are examples of a distinct sub type of bascule bridge, the "Scherzer rolling lift bascule bridge" or "rolling bridge". Bridges of this type do not pivot about a hinge point, but roll back on curved tread plates attached to the girders of the main span. This design allows a greater clearance of the waterway for a given opening angle.


German AA 20mm guns. Still in place after 70 years.


Pegasus Bridge from Benouville. Note how close the gliders landed (right)

On the night of 5 June 1944, a force of 181 men, led by Major John Howard, took off from RAF Tarrant Rushton in Dorset, southern England in six Horsa gliders to capture Pegasus Bridge, and also "Horsa Bridge", a few hundred yards to the east, over the Orne River. The force was composed of D Company (reinforced with two platoons of B company), 2nd Battalion, Oxfordshire and Buckinghamshire Light Infantry; 20 sappers, 249 Fd Co. (Airborne); and men of the Glider Pilot Regiment. The object of this action was to prevent German armour from crossing the bridges and attacking the eastern flank of the landings at Sword Beach.


Coup De Main: Five of the Ox and Bucks's gliders landed as close as 47 yards from their objectives from 16 minutes past midnight. The attackers poured out of their battered gliders, completely surprising the German defenders, and took the bridges within 10 minutes. They lost two men in the process.


One glider, assigned to the capture of the river bridge, landed at the bridge over the River Dives, some 7 miles off. Most of the soldiers in this glider moved through German lines towards the village of Ranville where they eventually re-joined the British forces. The Ox & Bucks were reinforced half-an-hour after the landings by Major Pine-Coffin's 7th Parachute Battalion, and linked up with the beach landing forces with the arrival of Lord Lovat's Commandos. (Kieffer batallion)

The bridge in Allied hands


Paratroops assembling the Mini Motorcycles used as transport

What happened in our Miniature Universe:

Wild Cards: Allied Players rolled +1 to reinforcement rolls; Axis player rolled the same
03.00 6 June 1944
Turn one. Allied Goes first per rules

The night time peace in Benouville was shattered by the thunder of exploding bombs and the drone of high altitude bombers overhead from midnight.

Hans Friedrichsen of the 716. Infanterie Division nodded at his comrade in arms, leaning on the barrel of his 20 mm AA gun at the bridge: "The poor guys over in Merville seem to be getting a pasting tonight. The verdamte RAF must be targeting their battery. Thank goodness we only have this small gun! We may even get some rest tonight!"

" Pity poor ol'  Leutnant Steiner ! He may go the same way Hauptmann Wolter did !" A guffaw came out of the dark. "Ja, but then I won't mind going the way he did! In bed, with a warm French Liebling! Not a bad way to cash in your ticket!"

His wish was not to be. Silently, 3 Gliders dropped down out of the ink black sky, coming to rest hardly 30 metres away from the bridge. "Achtung! Alarm! Alarm" he shouted, bringing his 20 mm to bear on the Horsa glider closest to the bridge. Dark figures spilled out, and the chatter of small arms fire was heard. He emptied the first ammunition clip on the advancing figures. One or two went down. Then they were upon him.


The Allies landed both a glider party and one paratroop party (Ox and Bucs) near the bridge over the Orne River at Ranville and the bridge over the Canal at Benouville. One set of pathfinders missed the drop-zone and was unable to take part in the first move as a result

The Germans had 2 Heavy machine guns placed at the approaches to the bridges, and when the first shots fell they stirred from their slumber. Being trained veterans they passed their pinning tests almost without exception, and were able to return fire an the Glider troops.Being dug in and gone to ground casualties were light. The gliders had landed in such a fashion that they did not provide much cover for the troops. They immediately went to ground.

The Germans raised the alarm in their turn, and successfully called up a unit of K-Rad Fahrer, who roared across the bridge on their BMW and Zundapp Motorcycles, MG 42s blazing. Lucky for the Brits only 2 LMGs were in rang.  A unit of medium mortars were dug in halfway between the two bridges. They started raining down shrapnel on the Tommies.


The Orne Canal bridge, with 20mm Cannon and unit of Krad Schutzen racing over the bridge to engage the Brit. Paratroops and Air Landing Troops


By Turn 2 only the command group of the 1st air landing platoon was still standing (or rather, dug in)
Reinforcements arriving and forming on their pathfinder, ready to take on the Hun! (Photo Roly Hermans)

Turn 2 saw more glider and paratroop landings. The lost Ox and Bucs paratroop unit still had not found its way onto the table, but another glider landed next to the bridge, and yet another was blow off course, failing to reach the DZ. Presumably this is the glider that landed at the River Dives. 4th Reg. Paratroops landed successfully at the Benouville side of the bridge, but the 716.ID provided stiff resistance.


View towards Benouville from Ouistreham and Merville at the far left. LZ for the planner Coup de Main at Right. To the left the 4th Para Regt. taking on the 716. Inf Div defenders, eventually routing and annihilating the unit, at the expense of not taking their objective, the bridge.


The Merville battery: 20mm AA and dug in medium mortars, twin AAs and Pak 40, Quad vierling 20mm, minefields. Formidable defenses. This is what faced the landing groups that overshot the Orne canal bridge in their landing. A very hard nut to crack!

The glider troops were now caught "in der kessel"; (in the pot)  ready for the "Kesselschlag" : Two pincers and bombarded by medium mortars, HMG, 20mm cannon and LMG on the northern flank, K-Rad Zug with 5 LMGs (and mobile) in the south. They resisted well, but at the end of play (German turn 3) it was clear that they were not going to take the bridges, and were hanging on by the skin of their teeth.

"Where was Lord Lovatt and his Commandos? and the Shermans the Hussars had promised? What, still on the beach! What are they doing? Sun bathing? "

"...Are those Stugs bearing down on us now?"

Even the stragglers eventually turning up on the table with  mortars and Brens did not assist in taking the bridges. To little, too late! The Germans were too well dug in. Supporting fire from the Merville battery also did not help! It is no fun having a quad vierling 20mm AA gun turned on you! And a Pak 40 firing 3 rounds per turn!

... Also, the 4th Parachute regiment went off on a tangent: Chased down and destroyed a unit of 716.Inf Div in harsh hand-to-hand assault: Gerry that turned tail on the Benouville side of the Bridge.

 "Oi! What about the objective!"
"What?"
"The objective!  The Allies could have taken this one!"
Well, at least the Benouville Bridge, was it not for a tactical decision in the heat of battle...

"Clear and imminent danger, you say? OK. I'll give you that."

16 April 2014

D-Day The quickening: AS51 Horsa lands on my Workbench

The Quickening: Airspeed 51 Horsa Glider arrives


Over the weekend I took some time to progress the landing zones for the D-Day games. At lunch-time I discovered that the Airspeed Horsa 51 glider for the airborne part of the game had arrived. Yay!


Transport for the 6th Airborne arrives


Progress Report:

The Playing Board:
The boards: The harbour of Ouistreham and the beaches at Luc-sur-Mer and Hermanville -sur-Mer have been created and painted,  the board depicting harbour, lock and canal,  rocky and sandy shores, deep and shallow water, the inter-tidal zone and the sea wall; as well as the villages and grassy hinterland.

Tank traps and concrete bunkers, hedgehogs and dragons teeth - all ready to roll

Buildings: The concrete blocks for much of the harbour and German  shore battery are made and painted. The buildings for most villages and the harbour installations are ready, or in the post.

 I still need to build the observation bunker at Riva Bella.
The Pegasus Bridge is under construction, and the canal bridge is ready.

Vehicles and planes
I have built two DUKWs and a Higgins Boat, as well as an LCT. Probably need another one of each at least. An RAF launch is half constructed.
The British armoured squadrons are ready to roll, as are the soft-skinned vehicles. Still need to attend to Hobart's Funnies- need 2 x ARVEs and Sherman Crabs

As for the German side- "Alles fertig und in ordnung!" (Ready and in order)


1 April 2014

Sword Beach: D-Day Gaming: The History reviewed

Sword Beach Landings on D-day


I've been reading up on D-Day with regards the Sword Beach Landings. I have chosen this landing for our D-Day Commemorative game mainly because the bulk of my 20mm  infantry models are British, and I don't think I'll have enough time to  paint up my US troops. I have enough Airborne and commando models to include the airborne assault. My allied armour has been left without national and unit  identification markings on purpose, so that they can be used on the Eastern front and for US troops as well. I will have to build some Hobart's Funnnies, as I don't have neither Crab or Crocodiles nor AVREs. We will use FoW rules, as my models are based for this rule set.


Sword Beach
SWORD BEACH was the objective of 3rd (British) Infantry Division. They were to advance inland as far as Caen, and line up with British Airborne forces east of the Orne River/Caen Canal. The Orne River bridges had been seized in late at night on the 5th of June by a glider-borne reinforced company commanded by Maj. John Howard. As at the other beaches, British forces penetrated quite a ways inland after breaking the opposition at water's edge. Unfortunately, the objective of Caen was probably asking too much of a single infantry division, especially given the traffic jams and resistance encountered further inland.

1st Special Service (Commando) brigade commanded by Lord Lovat, linked up in the morning with Howard's force at Pegasus bridge on the British left. Fierce opposition from the 2lst Panzer and later the 12th SS Panzer division prevented the British from reaching Caen on the 6th. Indeed, Caen was not taken until late June.

The landing beach
Sword Beach occupied an 8-km stretch of the French coastline from Lion-sur-Mer on the west to the city of Ouistreham, at the mouth of the Orne River, on the east. The area had vacation homes and tourist hotels and restaurants located behind a seawall. It was 15 km) north of the city of Caen. All major roads in this area ran through Caen, and it was a key city to both the Allies and the Germans for transportation and maneuver purposes.

The Germans had fortified the area with relatively light defenses consisting of beach obstacles and fortified emplacements in the sand dunes. For the most part, however, the defense of the beach was anchored on 75-mm guns located at the coastal town of Merville, some 8 km  to the east across the Orne River estuary, and on bigger 155-mm guns located some 32 km east at Le Havre. A few miles inland from the beach were 88-mm guns capable of supporting the machine guns and mortars that were placed in the dunes and villas and that constituted the Germans’ first line of defense. There were also antitank ditches and mines as well as huge concrete walls blocking the streets of the towns. The German 716th Infantry Division—in particular, the 736th and 125th regiments—along with forces of the 21st Panzer Division were in the vicinity and were capable of participating in defensive or offensive operations. To the east, across the Dives River, lay the 711th Division.


Sword Beach lay in the area of landing beaches assigned to the British 2nd Army,commanded by LtGen Miles Dempsey. It was divided by Allied planners into four sectors named (from west to east) Oboe, Peter, Queen, and Roger. Elements of the South Lancashire Regiment were to assault Peter sector on the right, the Suffolk Regiment the centre in Queen sector, and the East Yorkshire Regiment Roger sector on the left. The objective of the 3rd Division was to push across Sword Beach and pass through Ouistreham to capture Caen and the important Carpiquet airfield nearby. Attached commandos, under Simon Fraser, Lord Lovat, had the mission of fighting their way off the beach and pushing some 5 km (3 miles) inland toward the Orne River and Caen Canal bridges, where they were to link up with the airborne forces.

The invading forces landed at 0725 hours on D-Day and were greeted with moderate fire. They were able to put out suppressing fire, and by 0800 hours the fighting was mostly inland. By 1300 the commandos had achieved their most important objective: they had linked up with airborne troops at the bridges over the Orne waterways. On the right flank the British had been unable to link up with Canadian forces from Juno Beach, and at 1600 hours tank forces and mechanized infantry units from the 21st Panzer Division launched the only serious German counterattack of D-Day. The 192nd Panzer Grenadier Regiment actually reached the beach at 2000 hours, but the division’s 98 panzers were halted by antitank weapons, air strikes, and Allied tanks themselves. The counterattack was stopped.


At the end of the day, the British had landed 29,000 men and had taken 630 casualties. German casualties were much higher; many Germans had been taken prisoner. However, for the Allies the optimistic objectives of Caen and the Carpiquet aerodrome were still a long 5 km away.

 
Landings later in the day, once beach defences had been overcome - note the absence of helmets


Casualties and AVRE, and Wolverine, not Achilles, as first captioned, on the beach
 (Note lack of muzzle break, therefore not the 17-pounder gun, thanks for pointing that out Wingco Luddite!)

Difference between Wolverine and Achilles M10 Variants

Orne and Dives rivers air-assault zones
Paratroopers from the British 6th Airborne Division, Major General Richard Gale commanding, were to be landed at night onto the left flank of the Normandy Invasion area in order to help isolate the battlefield for the seaborne invasion force that was scheduled to land on nearby Sword Beach at dawn. The drop zones were labeled X, Y, N, K, and V. X and Y were glider landing zones near the two bridges over the Orne River and the Caen Canal. V was a glider landing zone near the Merville battery, and N and K were on the Ranville ridge separating the Orne and Dives rivers.

German forces in the area consisted of elements of the 716th Infantry Division. The dominant defensive position was the battery at Merville, with four guns of undetermined size fortified in hard casemates.

Troops

The objectives of the 6th Airborne were to seize, intact, the critical bridges over the Orne River and Caen Canal near the village of BĂ©nouville, securing vital exit routes for the forces scheduled to land at Sword Beach; to destroy the bridges over the Dives River, thus denying the Germans a route to the invasion area from the east; to hold the dividing ridge between the Dives and the Orne from an expected German counterattack; and, finally, to destroy the Merville battery, which threatened Sword Beach with its big guns.


At 0016 hours on D-Day, gliders containing Company D, 2nd Oxfordshire and Buckinghamshire Light Infantry, commanded by Major John Howard, touched down precisely on target at the bridges. Within 10 minutes and with the loss of only two men dead, the daring coup de main placed both bridges in Allied hands. Howard’s company thus became the first attackers of the Normandy Invasion on French soil and the first unit to achieve its objective on D-Day. The Caen Canal bridge was soon immortalized as Pegasus Bridge, named after the insignia of the 6th Airborne Division.

Pegasus Bridge
Pegasus Bridge

The silencing of the Merville battery fell to Lieutenant Colonel Terence Otway’s 9th Battalion. The 9th, however, had a bad drop, and the attack began with only 150 men of the 750-man force. The daring attack captured the battery at a cost of half the attacking force. The defending Germans paid a terrible price: only 22 men of the 200-man garrison were uninjured.

The rest of the 6th Airborne troopers continued to land throughout the night, although many were scattered. Nevertheless, small parties found one another and managed to destroy five bridges over the Dives.

By morning, as the invasion force rolled ashore on Sword Beach, the left flank of the area was indeed secure. By 1300 hours Howard’s glider troops at the bridges had connected with elements of Lord Lovat’s 1st Commando Brigade. As evening fell on June 6, the 6th Airborne was generally in place and had achieved its objectives.

Info from Encyclopaedia Brittannica and various internet sources. Happy to reference at request. No copyright infringement intended