Showing posts with label Merville. Show all posts

29 May 2014

Part 5 D-Day Refought: Merville Battery

D-Day Re-fought: Merville Battery:

 On 6 June 1944, the British 6th Airborne Division was given the task of securing the left flank of the Allied seaborne landings. One of their objectives was the destruction of the Merville Gun Battery. Allied planners had judged from the size of the concrete gun emplacements that the guns must be around 150 mm in calibre. If so, the guns would have a range of about 8 miles (13 km) and could threaten Sword Beach, to the west of Ouistreham, where the British 3rd Infantry Division were due to land later that day.


The Merville Battery was composed of four 6-foot-thick (1.8 m) steel-reinforced concrete gun casemates, each housing a Czech M.14/19 100 mm gun Other buildings on the site included a command bunker, a building to accommodate the men, and ammunition magazines. During a visit on 6 March 1944, to inspect the defences, Field Marshal Erwin Rommel ordered the builders to work faster, and by May 1944, the last two casemates were completed.

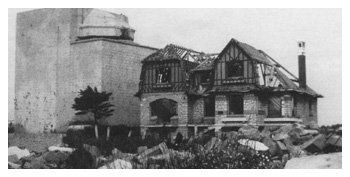
The battery was defended by a 20 mm anti-aircraft gun and several machine guns in 15 gun positions, all enclosed in an area 700 by 500 yards (640 by 460 m) surrounded by two barbed wire obstacles 15 feet (4.6 m) thick by 5 feet (1.5 m) high, which also acted as the exterior border for a 100-yard-deep (91 m) minefield. Another obstacle was an anti-tank ditch covering any approach from the nearby coast. The original commander of the battery, Hauptmann Wolter, was killed during a Royal Air Force bombing raid on 19 May 1944. He was replaced by Oberleutnant Raimund Steiner, who commanded 50 engineers and 80 artillerymen from the 1st Battery, Artillery Regiment 1716, part of the 716th Infantry Division.


The unit assigned to destroy the battery was the 9th (Eastern and Home Counties) Parachute Battalion, part of the 3rd Parachute Brigade, commanded by Lieutenant-Colonel Terence Otway. The battalion's normal complement of 600 men was supported by a section of sappers from the Royal Engineers, eight Airspeed Horsa glider loads transporting Jeeps and trailers, and stores including explosives, an anti-tank gun and flamethrowers.


Three of the gliders, transporting 50 volunteers, were to carry out a coup de main landing onto the position to coincide with the ground assault.

Just after midnight on 6 June, the 9th Parachute Battalion's advance party landed with the brigade's pathfinders, and reached the battalion assembly area without any problems. While some men remained to mark out the company positions, the battalion's second in command, Major George Smith, and a reconnaissance party left to scout the battery. At the same time, Royal Air Force Lancaster bombers started their bombing run, which completely missed the battery, their bombs landing further to the south. The pathfinders in the meantime were having problems. Those who had arrived at the correct drop zone found their Eureka beacons had been damaged when they landed, and in the smoke and debris left over from the bombing, their marker lights could not be seen by the pilots of the transport aircraft.


 The main body of the 9th Parachute Battalion and their gliders were to land at drop zone 'V', located between the battery and Varaville from 01:00. However, the battalion was scattered, with a number of paratroopers landing a considerable distance from the designated drop zone. Lieutenant-Colonel Otway landed with the rest of his "stick" 400 yards (370 m) away from the drop zone at a farmhouse being used as a command post by a German battalion; after a brief fire-fight, they helped other scattered paratroopers, and reached the drop zone at 01:30. By 02:50, only 150 men had arrived at the battalion's assembly point with 20 Bangalore torpedoes and a machine gun. The mortars, anti-tank gun, mine detectors, jeeps, sappers and field ambulance section were all missing.


Aware of the time constraints, Otway decided he could wait no longer, and the reduced battalion headed for the battery and joined up with Major Smith's reconnaissance party just outside the village of Gonneville Sur Merville. The reconnaissance party had cut a way through the barbed wire, and marked four routes through the minefield. Otway divided his men into four assault groups, and settled down to await the arrival of the three gliders.

In England, one of the gliders never left the ground, as its tow rope had snapped on taxiing. The other two gliders, unable to locate the battery, did not land where expected.  On their run in, both gliders were hit by anti-aircraft fire. One landed around 2 miles (3.2 km) away, the other at the edge of the minefield. The troops from this glider became involved in a fire-fight with German troops heading to reinforce the battery garrison.


Otway launched the assault as soon as the first glider overshot the battery, ordering the explosives to be detonated to form two paths through the outer perimeter through which the paratroopers attacked. The defenders were alerted by the explosions, and opened fire, inflicting heavy casualties; only four attackers survived to reach Casemate Four, which they disabled by firing into apertures and throwing grenades into air vents. The other casemates were cleared with fragmentation and white phosphorus grenades, as the crews had neglected to lock the doors leading into the battery. During the bombing raid, the battery's guns had been moved inside the casemates and the steel doors left open for ventilation.  During the battle, 22 Germans were killed and a similar number made prisoners of war. The rest of the garrison escaped undetected by hiding in the underground bunkers.


Steiner was not present during the bombing, but at a command bunker in Franceville-Plage. After the raid, he set out for the battery, but was unable to gain entry due to the volume of fire from the British paratroopers. At the same time, a reconnaissance patrol from an army Flak unit with a half-track mounting a large anti-aircraft gun arrived. The crew had intended to seek cover at the position, but instead used the gun to engage the paratroopers.

With the battery in their hands, but no sappers or explosives, the British gathered together what plastic explosives they had been issued for use with their Gammon bombs to try to destroy the guns.

By this time, Steiner had returned to Franceville-Plage, and directed his regiment's 2nd and 3rd Batteries to fire onto the Merville Battery.

Just before 05:00, the battalion's survivors, just 75 men of the 150 who had set out, left the battery and headed for their secondary objective, the village of La Plein. The battalion, being too weak, only managed to liberate around half of the village, and had to await the arrival of the 1st Special Service Brigade later in the day to complete its capture.

After the British had withdrawn, the Germans reoccupied the battery position. Steiner was unable to see Sword Beach from his command bunker, so even though he was able to get two of his guns back in action, he was unable to direct accurate fire onto the landings. However, observers with the 736th Infantry Regiment, holding out at La Brèche, were able to direct his guns until that position was neutralised.

The Merville battle formed a very small part of out D-Day scenario.

Effectively the Airlanding and Paratroops had to control the Orne River Bridges first, before they could advance on the Merville Battery.

The game: 

In our Mini Universe Leutnant Steiner was present from the preliminary bombardment, or if he wasn't, the German succession rule came into play, with a grizzled NCO stepping up; as the Germans were not pinned down. The Allied did not succeed in opening a path through the perimeter defenses.

The Allied paratroops were way off on the first landing, and only managed to arrive on the table in turn 2, and then only near the DZ of the horsa air landing group, directly in the line of fire of line on line of dug in defenders, minefields and barber wire defenses.


On the 3rd turn the 4th Airborne Regt succeeded in landing near Benouville and also to the east of the gun emplacements. Sappers gut the wires, and the Paratroops stormed into the Battery, only to find that the Germans had anticipated this move. 

A Pak 40 was rapidly swung around, and 3 shells tore into the tightly packed Parabats. Just to add to the hail of destruction the reluctant Luftwaffe AA gunners then turned their Flak vierling on the hapless group. 
(just like in te real history)

Several of the gunners also remembered those distant rifle range days, and let their Mausers do the talking. 

If A troop had not left the vecinity of the Benouville bridge they may possibly have given covering fore, and split the defenders' fire, but they were too far away. The confusion closely resembled the actual battle, and misfortunes that befel Otway's men. Lady luck was not smiling on out table-top Paras though.

 Dusk saw the battery still in German hands.


On 7 June, the battery was assaulted again by two troops of commandos from No. 3 Commando, part of the 1st Special Service Brigade. The attack in daylight was repulsed with heavy losses to the commandos. As they withdrew, they were engaged by the battery's guns firing over open sights.

The British never succeeded in completely destroying the battery, and it remained under German control until 17 August, when the German Army started to withdraw from France.

So it was in our alternate universe too.


28 May 2014

D-Day Part 4: Gliders and Parachutes: Pegasus Bridge and the Orne canal: Airborne assault

Re-fighting D-Day: Part 4: 

Airborne landings at Pegasus (Benouville) Bridge over the Orne Canal; and Orne River (Horsa) Bridge, Ranville, Normandy 


Operation Deadstick: D-Day Minus 1 or the Opening Shots, as you wish:

Historical background:

Orne bridges
Pegasus Bridge is a bascule bridge (a type of movable bridge), built in 1934, that crossed the Caen Canal, between Caen and Ouistreham, in Normandy, France.


Also known as the Bénouville Bridge after the neighbouring village, it was, with the nearby Ranville Bridge over the river Orne, a major objective of Operation Deadstick, part of Operation Tonga in the opening minutes of the invasion of Normandy. A glider-borne unit of the British 6th Airborne Division, commanded by Major John Howard, was to land, take the bridges intact and hold them until relieved. The successful taking of the bridges played an important role in limiting the effectiveness of a German counter-attack in the days and weeks following the invasion. Lord Lovatt's Commandos were to Land at Lion-sur-Mer and advance via Ouistreham to relieve the airborne troops. The


In 1944 it was renamed Pegasus Bridge in honour of the operation. The name is derived from the shoulder emblem worn by the British airborne forces, which is the flying horse Pegasus.


Pegasus Bridge and the structure that replaced it in 1994 are examples of a distinct sub type of bascule bridge, the "Scherzer rolling lift bascule bridge" or "rolling bridge". Bridges of this type do not pivot about a hinge point, but roll back on curved tread plates attached to the girders of the main span. This design allows a greater clearance of the waterway for a given opening angle.


German AA 20mm guns. Still in place after 70 years.


Pegasus Bridge from Benouville. Note how close the gliders landed (right)

On the night of 5 June 1944, a force of 181 men, led by Major John Howard, took off from RAF Tarrant Rushton in Dorset, southern England in six Horsa gliders to capture Pegasus Bridge, and also "Horsa Bridge", a few hundred yards to the east, over the Orne River. The force was composed of D Company (reinforced with two platoons of B company), 2nd Battalion, Oxfordshire and Buckinghamshire Light Infantry; 20 sappers, 249 Fd Co. (Airborne); and men of the Glider Pilot Regiment. The object of this action was to prevent German armour from crossing the bridges and attacking the eastern flank of the landings at Sword Beach.


Coup De Main: Five of the Ox and Bucks's gliders landed as close as 47 yards from their objectives from 16 minutes past midnight. The attackers poured out of their battered gliders, completely surprising the German defenders, and took the bridges within 10 minutes. They lost two men in the process.


One glider, assigned to the capture of the river bridge, landed at the bridge over the River Dives, some 7 miles off. Most of the soldiers in this glider moved through German lines towards the village of Ranville where they eventually re-joined the British forces. The Ox & Bucks were reinforced half-an-hour after the landings by Major Pine-Coffin's 7th Parachute Battalion, and linked up with the beach landing forces with the arrival of Lord Lovat's Commandos. (Kieffer batallion)

The bridge in Allied hands


Paratroops assembling the Mini Motorcycles used as transport

What happened in our Miniature Universe:

Wild Cards: Allied Players rolled +1 to reinforcement rolls; Axis player rolled the same
03.00 6 June 1944
Turn one. Allied Goes first per rules

The night time peace in Benouville was shattered by the thunder of exploding bombs and the drone of high altitude bombers overhead from midnight.

Hans Friedrichsen of the 716. Infanterie Division nodded at his comrade in arms, leaning on the barrel of his 20 mm AA gun at the bridge: "The poor guys over in Merville seem to be getting a pasting tonight. The verdamte RAF must be targeting their battery. Thank goodness we only have this small gun! We may even get some rest tonight!"

" Pity poor ol'  Leutnant Steiner ! He may go the same way Hauptmann Wolter did !" A guffaw came out of the dark. "Ja, but then I won't mind going the way he did! In bed, with a warm French Liebling! Not a bad way to cash in your ticket!"

His wish was not to be. Silently, 3 Gliders dropped down out of the ink black sky, coming to rest hardly 30 metres away from the bridge. "Achtung! Alarm! Alarm" he shouted, bringing his 20 mm to bear on the Horsa glider closest to the bridge. Dark figures spilled out, and the chatter of small arms fire was heard. He emptied the first ammunition clip on the advancing figures. One or two went down. Then they were upon him.


The Allies landed both a glider party and one paratroop party (Ox and Bucs) near the bridge over the Orne River at Ranville and the bridge over the Canal at Benouville. One set of pathfinders missed the drop-zone and was unable to take part in the first move as a result

The Germans had 2 Heavy machine guns placed at the approaches to the bridges, and when the first shots fell they stirred from their slumber. Being trained veterans they passed their pinning tests almost without exception, and were able to return fire an the Glider troops.Being dug in and gone to ground casualties were light. The gliders had landed in such a fashion that they did not provide much cover for the troops. They immediately went to ground.

The Germans raised the alarm in their turn, and successfully called up a unit of K-Rad Fahrer, who roared across the bridge on their BMW and Zundapp Motorcycles, MG 42s blazing. Lucky for the Brits only 2 LMGs were in rang.  A unit of medium mortars were dug in halfway between the two bridges. They started raining down shrapnel on the Tommies.


The Orne Canal bridge, with 20mm Cannon and unit of Krad Schutzen racing over the bridge to engage the Brit. Paratroops and Air Landing Troops


By Turn 2 only the command group of the 1st air landing platoon was still standing (or rather, dug in)
Reinforcements arriving and forming on their pathfinder, ready to take on the Hun! (Photo Roly Hermans)

Turn 2 saw more glider and paratroop landings. The lost Ox and Bucs paratroop unit still had not found its way onto the table, but another glider landed next to the bridge, and yet another was blow off course, failing to reach the DZ. Presumably this is the glider that landed at the River Dives. 4th Reg. Paratroops landed successfully at the Benouville side of the bridge, but the 716.ID provided stiff resistance.


View towards Benouville from Ouistreham and Merville at the far left. LZ for the planner Coup de Main at Right. To the left the 4th Para Regt. taking on the 716. Inf Div defenders, eventually routing and annihilating the unit, at the expense of not taking their objective, the bridge.


The Merville battery: 20mm AA and dug in medium mortars, twin AAs and Pak 40, Quad vierling 20mm, minefields. Formidable defenses. This is what faced the landing groups that overshot the Orne canal bridge in their landing. A very hard nut to crack!

The glider troops were now caught "in der kessel"; (in the pot)  ready for the "Kesselschlag" : Two pincers and bombarded by medium mortars, HMG, 20mm cannon and LMG on the northern flank, K-Rad Zug with 5 LMGs (and mobile) in the south. They resisted well, but at the end of play (German turn 3) it was clear that they were not going to take the bridges, and were hanging on by the skin of their teeth.

"Where was Lord Lovatt and his Commandos? and the Shermans the Hussars had promised? What, still on the beach! What are they doing? Sun bathing? "

"...Are those Stugs bearing down on us now?"

Even the stragglers eventually turning up on the table with  mortars and Brens did not assist in taking the bridges. To little, too late! The Germans were too well dug in. Supporting fire from the Merville battery also did not help! It is no fun having a quad vierling 20mm AA gun turned on you! And a Pak 40 firing 3 rounds per turn!

... Also, the 4th Parachute regiment went off on a tangent: Chased down and destroyed a unit of 716.Inf Div in harsh hand-to-hand assault: Gerry that turned tail on the Benouville side of the Bridge.

 "Oi! What about the objective!"
"What?"
"The objective!  The Allies could have taken this one!"
Well, at least the Benouville Bridge, was it not for a tactical decision in the heat of battle...

"Clear and imminent danger, you say? OK. I'll give you that."

16 April 2014

D-Day The quickening: AS51 Horsa lands on my Workbench

The Quickening: Airspeed 51 Horsa Glider arrives


Over the weekend I took some time to progress the landing zones for the D-Day games. At lunch-time I discovered that the Airspeed Horsa 51 glider for the airborne part of the game had arrived. Yay!


Transport for the 6th Airborne arrives


Progress Report:

The Playing Board:
The boards: The harbour of Ouistreham and the beaches at Luc-sur-Mer and Hermanville -sur-Mer have been created and painted,  the board depicting harbour, lock and canal,  rocky and sandy shores, deep and shallow water, the inter-tidal zone and the sea wall; as well as the villages and grassy hinterland.

Tank traps and concrete bunkers, hedgehogs and dragons teeth - all ready to roll

Buildings: The concrete blocks for much of the harbour and German  shore battery are made and painted. The buildings for most villages and the harbour installations are ready, or in the post.

 I still need to build the observation bunker at Riva Bella.
The Pegasus Bridge is under construction, and the canal bridge is ready.

Vehicles and planes
I have built two DUKWs and a Higgins Boat, as well as an LCT. Probably need another one of each at least. An RAF launch is half constructed.
The British armoured squadrons are ready to roll, as are the soft-skinned vehicles. Still need to attend to Hobart's Funnies- need 2 x ARVEs and Sherman Crabs

As for the German side- "Alles fertig und in ordnung!" (Ready and in order)


9 April 2014

Sword Beach: Ouistreham: The Plot thickens

D-Day Wargaming ahead: Kapiti Wargames Club Open Day

D-day gaming coming up on 10th May 2014:


So I have been plotting and planning on the D-Day gaming ahead. I have drawn up the plan (not to scale) of the game board, with areas representing the actual landing beach, the German Defenses and the villages of Collville -, Luc- and Hermanville-sur-Mer, and the small harbour at Ouistreham, the Orne river and Canal, the Orne river bridge, and the bridge now known as Pegasus Bridge. And the Merville Battery thrown in for good measure.

Historical Background:
Ouistreham was the key to the Allied attack at Sword Beach, as it was the gateway into the Orne, the Caen canal, and the cross-road hub town of Caen. Seizing control of the town would give the Allies a small port (nowhere near the size needed for sustaining supply lines, but useful, none-the-less), and control of the river and canal bridges so as to prevent German armor from hitting their left flank.

The Germans, needless to say, knew how important the town could be and made preparations.  The casino was retrofitted with a bunker in the basement and gun that could hit ships at sea as well as targets closer in. Other fortifications went in as well, and in a very flat area, a towering bunker designed to withstand bombs, artillery fire, and even gas/chemical attacks, was built behind an existing house to help disguise it a bit.  This was not a gun bunker - it was far more dangerous than that.  It was an observation bunker with a very accurate rangefinder for the time.


Keiffer Commando forces in house-to-house fighting in the advance towards Bella Riva. 
Duplex Drive Sherman leading the spear-head

Not only did the bunker survive the day, but the story of how it fell brings a smile to the face.  On D-Day, the bunker was bypassed after troops came under machine gun fire and grenade attack when approaching it. After the battle the structure fell silent, and it was presumed abandoned. On 9 June 1943, a Lt. Bob Orrell of the Royal Engineers was tasked with assessing and cataloging construction materials left behind in the Ouistreham area by the retreating Germans. On inspection he noted that the bunker was closed up,  and apparently locked from the inside.  He was ordered to investigate further, so he went back with a mobile crane and three assistants.

Observation Bunker 

The door was still locked, so he tried explosives: To no effect. They then tied other means of forcing the door, but finally went back to (more) explosives and succeeded in forcing the door open.

It was then that a voice called down in perfect English that it was "Okay, come on up !"  To which the good Lt. responded that he could not fly, and whoever was up there should come on down.  To his amazement 53 Germans descended and surrendered to a force of one junior officer and his three assistants.

The German HQ housed in the casino was not set back from the water, on a hill, as portrayed in the movie The Longest Day.  It was in fact set effectively on the beach with a ditch/canal in front.  The Keiffer (Free French) Commando forces did indeed take it; and also destroyed it, and today a new casino sits on the site.


One thing to consider about the troops making the beach assault though, is them having to cross as much as  300 meters of wet sand with absolutely no cover of any kind.  Because the invasion was scheduled for a period of extremely low tides, many troops coming in had to charge across up to 300 meters of open beach before hitting the edge of the beach and finding any potential cover.


Some inspiration from fellow gamers: Terrain and toy soldiers (clicky)


We plan to use the FoW rules from the D-Day Minus One and D-Day books, effectively having 3 games in one:

Thus a large table:

Allied Targets:
1. Beach assault, overcome German beach defenses, take the villages, including Oistreham; open the road towards Caen  - Beach Assault rules
2. Commando Assault: Take Ouistreham fishing harbour, knock out  defenses, Casino and  Riva Bella , link up with Airborne assaults at bridges/ Merville Battery - Beach assault or seaborne commando assault rules
3. Airborne Assault: Parachute and glider landings on Pegasus Bridge, Orne River bridge and Merville Battery

German Targets:
1. Prevent Allies from taking Ouistreham and beach (-sur Mer) villages, the German HQ in the Casino Riva Bella ; and establishing a foothold on the continent
2. Protect road to Caen, including bridge access across Orne river and canal
3. Protect Merville Battery

To make things a bit more interesting we have decided to throw in a few historical wildcards. At the beginning of the game we'll roll to see if any specific conditions may affect the way that the game plays out:

Allied Wildcards:
Fortune cards:
  • Successful  preliminary bombarding: Roll D6: On roll of 5 or 6 Allied player gets additional round of preliminary shelling , 3 or 4 re-rolls on fails to wound, 1 or 2 re-roll fails to hit  
  • Mill pond: Weather and tide does not affect landing,  +1 to all rolls caused by weather effects
  • Partisan attack: Place one infantry section within 24 inches, but more than 12 inches away from German infantry troops. These count as being in ambush, Conscripts, fearless
Misfortune cards:
  • Wild weather: Weather and tide affects landing severely,  -1 to all rolls caused by weather effects
  • Beach defenses effective: - Roll D6: On roll of 5 or 6 Allied player has to roll for every landing craft or tank as it gets into the landing zone: A rolls of 1 makes vessel capsize/tank flood, 2  or 3 stranded until next turn (caught up in obstacle but freed, can land cargo next turn); 4 or 5 delayed (can attempt landing again next turn) ,  6 delayed and return to landing ship (sea zone) (can attempt again next turn)  
  • Luftwaffe and Kriegsmarine interception:  Roll D6: 1-3:  Luftwaffe available Roll again- determines level of availability. 4-6;  Kriegsmarine (U and S-boats) Same rule, but can only target landing craft (No extra cost to axis player)
German Wildcards:
Fortune cards:

  • Luftwaffe cover available: Roll to see level of cover (no extra cost)
  • The Fuhrer's Blessing: Rommel takes command (All Axis troop morale +1, to max fearless veteran; Armour support arrives on  D6 Roll: 1-2 (turn 4) 3-4 (turn 3) 5-6 (turn 2)
  • Hitler's Fire-brigade: SS Panzer Division and Panzer Lehr become available D6 1-3 (turn 4) D6 4-6 (turn 3)

Misfortune cards:
  • Partisan attack: Allied player places one infantry section within 24 inches, but more than 12 inches away from German infantry troops. These count as being in ambush, Conscripts, fearless
  • Turncoat Osttruppen: Russian POW troops: First contact: Roll Morale test: D6. Roll for every unit: On roll of 1 surrender without fight, roll of 2: -1 to morale; 3-6 morale per book. German player can motivate using German Oficer, sacrificing one platoon unit a-la- USSR Commisar rules.
  • Caught pants down: All troop morale -1 for first 2 rounds,  Armour support arrives on D6 Roll: 1-2 (turn 4) 3-4 (turn 3) 5-6 (turn 2) German troops cannot make storm trooper moves first 2 turns.