Showing posts with label Sherman. Show all posts

22 November 2014

The Facts and the FURY: M4A3E8 Sherman

FURY: M4A3E8 Sherman in the movies

I saw “Fury” with my son Luc, and Mark T. and his son Cameron last night. Stopped for a curry at at our favourite restaurant on the way in, and settled in to watch the latest war movie offering at the local cinema.


I thought it was well worth the effort.  A brutal, realistic, violent portrayal of tank warfare, a story not often told. I thought it one of the better movies I've seen focusing on the subject.

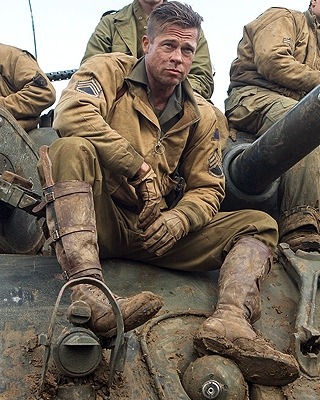
“Fury” revolves around the tank crew of a late war M4A3E8 Sherman tank with the name “Fury” crudely painted on the barrel of its 76 mm gun.  The crew is commanded by Staff Sergeant Don “Wardaddy” Collier (Brad Pitt).  The rest of the crew consists of veterans Boyd “Bible” Swan (Shia LaBeouf) the gunner, Grady “Coon-Ass” Travis (Jon Bernthal) the loader, Trini “Gordo” Garcia (Michael Pena) the driver and the very green and sensitive Norman "Eventually to become Machine" Ellison (Logan Lerman), a soldier from the typing pool press-ganged into serving as the bow gunner due to a shortage of trained tank crewmen.

From a historical equipment and military hardware depiction perspective, the movie is great.  Unlike most other war movies I've seen there are relatively few inaccuracies to distract from the movie’s message.

I appreciated the use of  different types of rounds against different targets as well as  personal idiosyncrasies of the lead character carrying a colt six-shooter revolver (A-la Patton, albeit not a pair of pearl handled six-shooters) and a German MP 44 SMG, and also the hypocrisy of looting war medals off dead enemies, displaying them in the tank; and then shooting a German soldier who was wearing a US trench coat in the back. There was several sub-plots that I found quite interesting: History buffs may have picked up on some of them. I may also have missed a few. Later more on that.

The interactions between soldiers, superiors, subordinates, civilians and the enemy come across well, although a bit stereotyped. (Inexperienced and disrespected junior officer sending the platoon off to their doom, and the battle-hardened field commander, "You're all that we have", sorry to send you-in-but-hold-the-line-and-buy-us-time cliches)

Speaking of stereotypes, the director/screenwriter (thankfully) chose not to have the stereotyped African American, Jewish or Italian crew members. No slur intended in saying this, but in some ways I found it refreshing to escape the common Hollywood angst subjects. Instead they opted for a Hispanic, bible punching Episcopalian and a Cajun Swamprat...

German officers were the usual (ho-hum) stereotypes of fanatical Nazis who mindlessly send their troops in to die and kill innocents left right and centre. Even the field officers. Historically this was not the case. Just like the British and Americans, German officers and NCOs led from the front, cared about their men, and even late in the war, and suffered an incredibly high rate of attrition.

The final scene of droves of SS troopers in a suicidal rush attacking a tank with small arms while their officer stands by egging them on, is a little hard to believe. When they were seen marching up they had enough shouldered panzerfausts to make them look like an asparagus field! The officer than later cracks open a packing case, nowhere seen before, and exclaims: "These are the only ones we have"

These were supposedly elite soldiers, well led and trained, and even if inexperienced, their NCOs/officers would not have committed them to a suicide attack while they had perfectly good anti-tank weapons. Against an immobilised Sherman. And not taking cover ? Deploying the MG 42 in the open ?
But I suppose you could pick holes in anything, and the object of the movie is entertainment, and not military accuracy after all.

The German speakers among us also probably picked up that the subtitles were quite often inaccurate to what was being said or written on the placards of the executed civilians, for example. Not that it detracted majorly from the story line, but just saying. (One placard on a strung up woman read: "I would not let my children go to war" and it was subtitled " I would not go to war" and Brad Pitt also read out it incorrectly to his crew. So much for being a German speaker as the movie implies. (Think a little pathos in the script was lost there as a result.)


He also addresses the 20-something young woman as "Maedchen (little girl) where any German speaker would have addressed her as " Fraulein" (Young Lady); as the subtitles this time grammatically correctly read, but did not reflect what he actually said.

The unsung heroes of the movie are the tanks though.  The movie features the only running Pzkfw VI Tiger tank in the world (The Bovington Tiger) and uses several versions of the Sherman which would have been very accurate for the time. In Saving Private Ryan a T-34 was dressed up to vaguely resemble either a Tiger or late model PzKfw IV.

 Unlike in today’s combat units, Allied units did often have mismatched equipment as new vehicles were supplied to replace older models that were destroyed/damaged beyond repair in combat. Older models were retained until they were considered obsolete or unserviceable.  This is noticeable when looking at the American tank platoon that had various models of the M4 Sherman (at least 3 that I could identify without losing the plot of the story by focusing solely on the hardware)


This is historically important, as only the last production model Shermans (Armed with the 76 mm high velocity gun) had any real chance of penetrating most German heavy and medium tanks (Pzkfw V Panther  and Tiger I and II by the end of the war) at a distance. German tanks could engage and destroy Shermans at long range, whilst the standard 75mm rounds failed to penetrate the thick frontal armour of the German tanks. It wasn't uncommon to need a five to one (or more) ratio of Shermans to one Tiger to overwhelm the enemy.
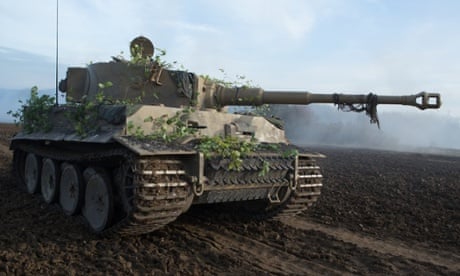
The Bovington Tiger

This is accurately portrayed as the 75 mm guns fail to make any impact on the Tiger and its 88 mm take them out with comparative ease over the same distance. The 76 mm of the Easy 8  also only destroys the tiger at short range, from the rear, and by out-maneuvering it, and then firing 2 shots at point blank range

Click here for a walk-around the Sherman M4A3E8 (Easy Eight) that was used in the filming of Fury

One criticism I would have of the fire-fight scenes is the decision to use laser to depict tracer. The flight paths were inaccurate and it looked a little like star-wars. (But then that was probably a safety decision, but it could just as easily have been done in CGI.)


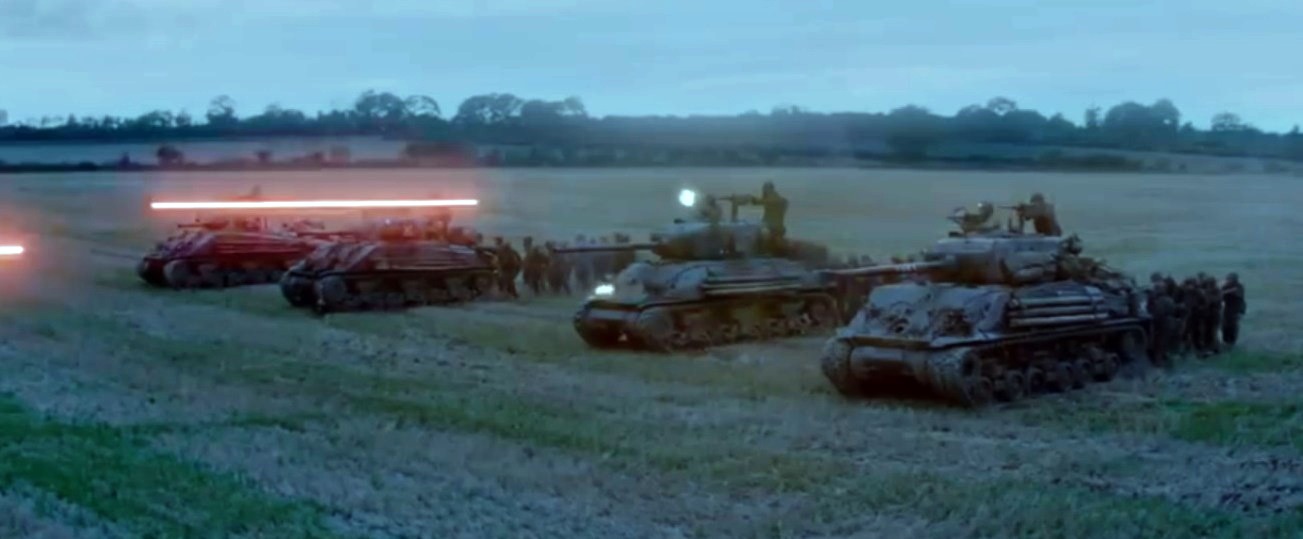
 If you've ever seen real tracer fire you'll agree it looks nothing like that. The flight path is more parabolic and appeared linear in the shots. Though the US did use blue tracer, it was far more common to use a yellowish red.The only picture I could find (above) shows the red tracer, but the blue was very apparent in the movie.


I enjoyed a the good Hollywood style yarn, never the less.

The Guardian in the UK has the comments from a 91 year old radio operator veteran on the movie:

"Fury accurately portrays how superior the German tanks were. A Sherman provided you with protection against most enemy fire but against a Tiger it could easily become your coffin. I remember a very near miss where an eight cm shell from a Tiger tank went within inches of our turret and we decided not to stay around too long after that. In open combat we never had a chance. So, like in Fury, we always had to be one step ahead. It was only because we could call up air strikes and had many more tanks than the Germans that we eventually won."

As the film makes clear, a Sherman tank was a lightweight in comparison to a Tiger. The Sherman weighed 33 tonnes and had a 75 mm gun, compared to the Tiger's 54 tonnes and a 88 mm gun. A Tiger also had 3.9 inch thick armour, so shells from a Sherman literally bounced off it.

"Fury shows just how vulnerable you were fighting in a Sherman tank. There is a lot of blood and gore in the film but nothing can really come close to the true horrors of tank warfare. I saw people being blown up and burnt alive. Going to see Fury you don't get that dreadful, nauseating smell of burnt flesh. That will stay with me forever."

"I was in the Essex Yeomanry, a territorial regiment. All the crew were from Essex except me. It took us a while to get along but then I trusted them implicitly with my life. We fought along side the Americans in their Sherman tanks and I found them to be very brave. We didn't write the name of our tank on the barrel like they did in Fury or plaster the inside with photographs but we were just as proud of our tank. Ours was called Beverley and her name was written on the turret."

The corpses certainly mount up in Fury, particularly in the final scene. This was the only part Bill,  (the veteran) too, felt lacked credibility.

"I thought the film showed accurately how tough life could be in a tank, but the final scene where the crew hold out against a battalion of Waffen SS troops was too far fetched. The Germans seemed to be used as canon fodder. In reality they would have been battle-hardened and fanatical troops who would have easily taken out an immobile Sherman tank using Panzerfausts (an anti-tank bazooka).

They also seemed to have an inexhaustible supply of ammunition and fuel. A Sherman tank only does five miles to the gallon so I think they would have run out long before the final showdown."


The Easy 8 used in the film as well as the Tiger are now on display at Bovington. Clink on the link for more pictures of both vehicles and the opening of the display: Blackmore Vale Magazine


28 May 2014

Discovery: The Cobbaton Collection

I came across this on the net today: The Cobatton collection
Photographed by Jay Wilkinson


Photo Jay Wilkinson (No copyright infringement intended)

I have never heard of this collection, but what a treasure trove!
The presence of an AVRE Petard Mortar above in particular caught my fancy!

Eclectic and priceless, and by the looks of things well worth a visit if you're going to the UK!

Link: The Cobbaton Collection (clicky)

and their official site: The Cobbaton Combat Collection

Lots of detail, but sparse in photographs.
Love the tagline though, " a hobby that got out of hand"
Sounds all to familiar!

20 May 2014

Battle Report: Sword Beach D-Day: Luc-Sur-Mer

Battle Report: D-Day Sword Landings Part 1: Luc-Sur-Mer

Dawn broke on the 6th of June 1944. The German lines at Luc-Sur Mer had taken a beating from Allied bombers overnight. One of the multi-story buildings on the waterfront had been all but destroyed, but the Ost Truppen huddled in the trenches and the bunkers remained unscathed.


" Herr Leutnant! Englischer Schiffe!" The junior officer visibly paled when he brought his binoculars to his eyes. As far as he could see the horizon was packed with ships. The next moment naval shells screamed overhead.

 " Es fingt an..." -  It has started, he said. Here's to hoping these Ost Truppen will hold!


Luc-sur-Mer at Dawn 6 June 1944: German occupation troops dug in, 
88mm Bunker and 75mm Tank Turret to theright, at left, Pillbox HMG and LMG, 
rocket launcher battery and Pak 40s in fields beyond

The gamers rolled first for wild cards- the Luc-sur-Mer (LSM) sector of the board rolled improved skills for the Infantry: Went from reluctant trained to confident veteran, a useful roll. Allies rolled for extra armour support (+1 to rolls for armoured reinforcement landing)

Turn 1: The allies went first (as per the real battle): First a preliminary naval bombardment, which took out one of the Flak Vierling AA guns protecting the rocket launcher battery set in the fields beyond LSM.

The landing craft arrived, disgorging sappers on the beach, and calling in a flight of Hawker Typhoons. 3 aircraft made it to the area, and attacked the dug in troops in the trenches facing the beaches. The dug in Ost Truppen (now confident veterans) lost some platoons, but held, ready for the coming onslaught


The first British wave to land: Sappers of the 22nd Dragoons (3rd Inf Div)
Their task to destroy the beach defenses to allow the tanks to move into LSM

Germans returned fire, taking out the lead sapper command group with their machine-gun fire and fire from the trenches. The sappers were unlucky enough to be just within the range of the nebelwerfers, which then proceeded to unleash a hail of death upon them. The survivors of the first wave were pinned down on the beach, and failed to reach the minefields and tank barriers they were attempting to destroy, to allow the masses of tanks in LCTs approaching in the second wave of landings.


The Nebelwerfers dug in near the town's water supply unleash their deadly barrage on the beaches:
Ost Truppen and 88mm AA gun protecting their flank and frontal arc respectively


Turn 2: More sappers land and a flight of Typhoons deliver more death to the German trenches.
Well fortified and dug in, they survive the ordeal, but radio for AA support.
 Where is " Der verdamte Luftwaffe? "

Turn two saw some allied tanks make it to the beach- a unit of DD Sherman tanks. These waded out of the water before opening fire on the German emplacements. A heavy MG nest was taken out by this assault. The second wave of landing craft also deployed more sappers, who hurried up the beach, only to meet the same fate as those landed in the first wave.

These however had learned from their compatriots' misfortune, and stayed out of range of the rocket launchers. A single surviving troop of the first landing made it to the beach defenses, and started preparing the way for the next landing of tanks. The dug in static German Infantry, in trenches and buffed up to confident veterans withstood wave on wave of attack, with minimal casualties.

The Germans brought up a 37 mm AA gun mounted on a half-track to defend the infantry from the incessant harrasment by the RAF, only to find the fiendish pilots changing their flight path to avoid the German shells.

The 21st Panzer Army's Stug IIIs arrived from Caen, and moved towards LSM, to the cheers of the Heer artillery, who found that the clever Tommies stayed well out of reach of both the Nebelwerfers and LeFH18 fieldguns. The ruins of LSM also prevented the 88mm guns from drawing a bead on the tanks on the beach.

To relieved grins the 21. Pz Div started moving down the road towards the beaches. This time Allied Aircraft were intercepted on their way in, and did not arrive at the scene of the battle. More smiles from Herr Oberleutnant Rhyn von Rheenen zu Fischer, commanding the Panzer column:


Turn 3 saw the Allies land several more M4 Shermans from LCTs and also  2 Churchill AVRE bunker busters, as well as a Churchill VII onto LSM Beach.

 They made short shrift of the 88 mm Gun emplacement and the 75 tank turret bunker guarding the beach approaches. Both went up in flames. They also carefully stayed out of reach of the rocket launcher range. The Germans in their turn successfully brought up a platoon of reinforcement PzKfw IVs from the direction of Caen, and went hammer and tongs at double time to try and get to the beach head, but it was a very looooong way from the back of the board !


The deadly bunker-busting AVREs

Turn 4 saw the Allies still on the beach, though the beach defenses at LSM had now broken, all that stood between the allies were the trenches of the Ost Truppen of 716. Infanterie Division. Luckily these held, not withstanding another rocket attack by 2 typhoons, this time from the Lion sur Mer side of the beach, clearly to avoid the 37mm AA gun now parked near the trenches. The Allied commander landed more Shermans, and a unit of Wolverines at LSM, ready for the punch that would take them into the town, and beyond to the rocket launcher unit. All that stood between them and that objective was a thin grey line of dug in troops (in bullet proof cover), 3 PzKfw IVs, 2 Pak 40s, and 5 StuGs, who now seemed to be heading towards Ouistraham and the Orne River bridges.


Allied Armour about to crush the entrenched Germans, bunkers burning fiercely as shells start exploding in the German fortifications...but saved by the end of play. 

The sun set all to soon, with the Allies still on the Beaches, and the objectives still in German hands. Technically a victory for the Germans, as the Allies were still trapped on the beaches. Given another turn or two a totally different outcome may have transpired. Pity we had to vacate the hall. Things were just getting interesting...

Tune in again  for part 2 of our 3-part D-Day landing story: Lion-sur-Mer and Hermanville.

What did Herr General Oberst learn?
1. When you have artillery dug in to attack a beach, make sure that they are within reach !
2. We were limited in setting up our boards and terrain due to net getting access to the hall the previous night. The terrain was not entirely what I had planned or envisaged as a result, but it worked ok. We lost 2-3 hours' playing time, and couldn't finish our game due to the time constraints this causedt. The day went well though, despite all of this.
3. As an exhibition game it went well, giving several newcomers their first taste of wargaming, and for some a first time away from WH 40K:


Visiting 40K playes getting their first taste of FoW


Break-through on LSM Beach about to happen, tightly clustered armour from an inexperienced  gamer offering a tempting target for the old hands, also now within range of the Nebelwerfers, and 
3 PzKfw are about to come charging around the corner of the double-story holiday villa at right. 
And then the sun set. Drat!


2 July 2013

Falschirmjaeger defeat at Triomphe-de-Luc

Kapiti Wargames Club Open Day: 

Falschirmjaeger defeated by Allies at Triomphe-de-Luc.


The KWC had its 2nd open day on 30 June 2013. It was a great success, with many visitors and a range of games being played, from StarWars X-Wing through to the 7 Years'War.

I fielded my 20mm Falschirmjaeger with Divisional support against Luc's Brit Motorised Infantry, again with plenty of support. We played a FoW game, Fortress Europe, with approx 2800 points a side.


Brigadier Luc ably assisted by Major Cameron deploying the British forces
(Photo credits first 3 images  Jack Penman Photography)
Balance of photographs my own photography


Deploying the Falschirmjaeger


Vue de La ville D'Armand

 Being mostly a display game we though to load the table (which was probably too small for the scale of the game and number of points) with models.


Falschirmjaeger with divisional support: Tigers and Flak Vierling 20mm AA guns

My Falschirmjaeger were garrisoned in the town of Armandville (Hermanville in German), a town in France, defending across a river, with three access points, a road bridge, a rail bridge at the west and ford to the east. The Falschirmjaeger were well dug in, with 4 heavy machine-guns in Tobruk pits, light mortars, a battery of 4 Nebelwerfer and a battery of 2 LeFH 18 Howitzers supplied by Divisional Command. 4 Tiger Panzers and 4 PAK 40s were holding the village square and access to the Scientific research station and fuel dump in the Industrial area at the North end of the town.Reinforcements by rail in the shape of 3 PzKfw IVs has been promised, and the Luftwaffe supplied sporadic air support. A troop of Falschirmjaeger were also arriving as reserves from the neighbouring village.


View to the South: Nebelwerfer and leFH 18s

The ford at the south was relatively weakly defended, by 4 LMGs and supported by 2 Stug Gs

Reserves were deployed in a random fashion, arriving from a table edge designated by the roll of the dice, and on a roll of 6 in the first turn, 5 in the next, 4, etc, etc.

The Brits deployed in pincer fashion, with 3 Churchills leading the charge, followed by 6 M3 Halftracks, each with 2 50 cal machineguns. The Brits deployed  six x 6-pounders towed by universal carriers, backed up by 3 Sherman 75s on the other flank. The centre was held by 4 shermans led by a firefly gun-tank.The Royal engineers raced towards the railway line, set on destroying this avenue of resupply for the German garrison. Australian Field artillery in the shape of 4x 25-pounder guns provided bombardment clout. Of course, RAF  typhoons provided priority air cover.


Guarding the bridge approaches: Tiger, Pak 40s and MGs in Tobruk pits

The German garrison rolled to have the first turn, essentially stayed put, maneuvred to get better line of sight of the approaching forces. Only the nebelwerfers and 105mm Howitzers were in range. The Stukas arrived, and delivered death to 2 squads of the Royal Engineers attempting to blow up the railway line.

The Nebelwerfer took out two bren carriers with their 6pdrs still in tow. The LeF18s took care of 2 of the 25pdrs. The Falschirmjaeger watched, and waited...


Nebelwerfers locked and loaded...

The Royal Engineers immediately laid charges on the railway line, detonating 4 successfully. Needing another 2 demolitions they seemed well set to deprive the German garrison of more Panzers.

The 25 pounders found their mark on the StuGs and supporting infantry, killing several MP34 teams outright, but failing to damage the StuG or the Horch Field Car of their unit commander. The Churchills, Shermans and M3s closed in, attempted to take out the artillery observation teams, but failed at this.The typhoons arrived, but were seen off by the quad vierling AckAck batteries. The UK units who had not fired yet then laid down a massive smoke screen across the road bridge, obscuring the view of all but one of the Tigers, all of the Pak 40s and all of the Tobruk pits. A very tactically sound move by Brigadier Luc!


Turn 2 saw the StuGs advance through the ford, one Tiger probe the smoke screen, and take possession of the road bridge. The advancing allied infantry were now within range of the stummelwerfer mortars, who rained oblivion on the advancing Tommies.


The Tiger supporting the Company commander fired at extreme range,but the 88mm kanone failed to damage the advancing Churchills. The reinforcements from Ville d'Jeanette arrived on the East side of the board, and reinforced the advancing StuGs. The Nebelwerfers ranged in, but failed to do any damage, and the LeF18s destroyed one more of the 25-pounders. The StuGs destroyed another 2 of the 6-pounders, now unlimbered, leaving one only, who found that discretion was the better part of valour.

Turns 1 and 2: Result of the Nebelwerfer salvo and Stug Fire

The smoke screen laid down by the Tommies prevented any further significant action, and the Stukas were driven off by the infernal RAF!

Luc's Turn 2 saw the Royal Engineers destroying the railway approach to Hermanville.


PzKfw IVs on rail cars, never made it to Armandville due to Royal Engineer action


 The M3's charged forward, decimating the Falschirmjaeger dug in on the river bank. The MGs on the Churchills and Sherman adding to the annihilation of my elite troops.


He rolled for his reinforcements, and they arrived in the rear of the German Forces! 5 M10 Tank destroyers rumbled into the town. 2 took the fuel depot and 3 ground their way into the square.

The Tigers stood no chance!


 Volley upon volley of AP rounds crashed into the unprotected rear of the Tigers, destroying 3 outright! The Shermans and Churchils poured their fire onto the remaining Tiger, positioned on the bridge and scored several hits. The Tiger failed his armour save!


Caught in a vice, with their armour gone, and the fuel dump (Objective)  in British hands, the decimated Falschirmjaeger had no choice but to surrender.


The towns-people rejoiced, and renamed the town of Armandville to Triomphe-de-Luc in recognition of the deeds of their Liberators.


But not enough...


13 May 2013

Panzerlust

Panzerlust


I stumbled across this great website on the Bovington Tank Museum in Dorset, UK.
the author/photographer is Bernard Zee:

Check out his great photos: Bovington Tank Museum


No copyright infringement intended.

28 February 2013

FoW: And then I had my whole foot in...

Flames of War 20mm: And then I had my whole foot in...

Ok so we get to the club last night, and it's my German Panzerkompanie up against Luc's UK Armoured Squadron in Normandy. Late war. Flames of War in 20mm

Free-for-all and objectives to seize and hold, 2 each. A river runs through it, with a bridge and mill-house, small forest and village. Open fields mostly.Still struggling with numbers of models, as our armies were build for Warhammer WW2. Troops not on multi-bases. Not nearly enough artillery or Shermans, not the right light models  tanks on UK side. End up using Matildas as Stuart replacements, and M10s as stand-in Shermans

Slow start, as we're still feeling our way. Mike is at hand to help with rules, going a lot easier this time...more enjoyable. Our confidence and enjoyment improves turn by turn.Thank you very much Michael!

I choose to defend the approaches to the bridge with a pair of portee Kfz 7 Flak vierling 20mms, also giving cover to my motorised infantry. Not much space for my recce Zundapps with sidecars to maneuvre. LeFH 18s deploy on the edge of the boasrd, covering the right hand corner, Company commander in lead Panzer over to thier right. Panther company skulking behind the mill house, with one covering the bridge approach, and two covering the flank.

Luc places his field artillery (25 pdr x 2) opposing mine, 2 troops of 4 each Shermans with a firefly gun-tank each on that flank, and another troop on his side of the bridge. Motorised infantry deploy on other side of river facing him. Troop of 3 Stuarts supporting them


Firefly in my sights. German Command Tank advancing.


The Ill-fated QF 25 pounder battery, shortly before the Luftwaffe's visit.
Shermans passing by. This troop ended up taking the majority of the Panthers out.

First 2 turns is mostly tactical maneuvring, both side's foot soldiers digging in. Armour jostling for position. Herr Oberst in Panzer 1 takes out Firefly on approach to bridge, just to be taken out in return by a flanking troop with another firefly. Luftwaffe arrives on turn 2, contarary to expectations, 3 make it through the air defences, and takes out the whole 25 pdr battery, HQ escapes the blast, hops into their Bren carrier; and goes and sits on objective to defend it for the rest of the game. Lucs turn 2 sees his Stuarts (Matildas) taking out most of my motorised platoons' MGs, and laying down a smokescreen to further protect his dug in motor company.Spectacular fail on roll to bring on air support: 4 ones and 3 two's!; the RAF miss their target completely. Germans relieved.

Almost an ambush. Panthers protecting the bridge and the objective marker from behind the Mill House


Infantry face off across the river, both sides dug in.


Lots of baling out and clambering into vehicles in the next turn, a couple of Shermans destroyed by the panthers. Luftwaffe arrives again, a single aircraft makes it to target, anti-aircraft fire from Stuarts fail, and 2 of their number succumb to the direct hits from the veteran dive-bomber pilots. Sherman on the bridge now lay down smoke to protect their infantry. Panzergrenadiers unfussed, move forward through river, difficult terrain no problem for them, same with motorcycles, who cut through forest and attack the flank of the Tommies. Shermans open fire, and destroy the German transports struggling through the river. The Captain and his Protze staff car make it through unscathed. The surviving troops divert for a gap between the bridge and the houses, trying to make it to the objective beyond, taking cover behind a house.RAF finally make it through, only to be destroyed by the Flak before launching their rockets. Sherman takes out one in retribution on Luc's turn.


None of these Shermans survived the battle.


Movin' out. Luc's turn 1. Only one Sherman from this troop survived the Panther attack. 
Ok, the luftwaffe also took 2 out!


Ranging in...Open sights of the enemy

Luftwaffe at hand. 

Carnage after they had been...


With only one Stuart (Matilda) to oppose them the motorcyclists cross unhindered

Meanwhile a drama is played out behind the mill house, slug-fest between the panthers and Sherman troops.
The 2 IC panzer is flanked, hit repeatedly, baled, but remounted every time by the experienced crew. Impetuous sherman crew pay the price. Approach to bridge now open, and the panzer crew eagerly eye the objective just beyond the bridge. Only problem is the hulks of multiple burnt-out Shermans on it. While they are still contemplating what to do next they receive a long range shot from a firefly that sends the wonderment into oblivion in a ball of smoke and fire. Same fate befalls another Panther, breaks the line of approaching Shermans, takes out the firefly. Sole survivor retreats back towards objective. Coward Tommies, lets get them!, race forward thinking that cover from hulks on battlefield will protect, But no, the only surviving firefly has the last word: Boom! Panzer Zerstoerd (Destroyed)


Only one Panther, the Field Artillery, Zundapp riders and the one 20mm Flak vehicle survive. O yeah, and Herr Kapitan with half his Sturmtruppen, behind the house.

A good victory to Luc! A much more enjoyable game once you get the rules.

Lessons learned: 
1. Get the right models, and enough of them
2. Read the rules some more, watch the videos again
3. Base the infantry on team bases
4. Panthers pack good punch, but are a bit lacking in side armour. As an expensive option Tigers may be better.