23 March 2015

Chunuk Bair: My Turks go over the Top and the ANZACs arrive

WW100: My Turks go off to war, and the first ANZAC troops line up on my workbench

Sam rings me today: "Are you ready for some more Gallipoli models? 
A few guys have pulled out, and we have a deadline looming"


 "How many have you done ?"
" Ten."

"How many more can you do ?"
" Another Ten."

 Silence,
 "...or twenty."

More silence

" Maybe thirty... "


Bewildered Turks fleeing a spectre of an ANZAC soldier


"I'll bring them to you tonight..."

 So a few quick snaps before these Turks that have been languishing on my workbench go off to Gallipoli and the tender ministrations of Mustapha Khamal.

"How many has Scott done?"
"Fifty ! "

"Fifty ? "

Ok, some ANZACs this time. 

Sam realises I am pushed for time, with a friends wedding and stag do to organise (best man at my ripe old age) , family birthdays and on call commitments. 

So: Wounded and kneeling ANZACs, and sundry lost or discarded equipment now on my workbench. 


Quick flash removal job. Yay! Slice my finger with a scalpel blade. 
...That's when you get for being lazy. Get out the dremel. 
... Buzzz...flash begone!

Mix Araldite (Yeugh!) 
Heads on, leave overnight to cure.
Arrange in sorry looking pile of wounded and kneeling soldiers.
Paint case happens to have bright red splatters of ink from a previous job on it, 

Or was it my blood? 
Or was it theirs?


Lead soldiers tumbling off balsa blocks...


I think back to this afternoon:  

Saw an 88 year old lady in my surgery. Have known her for 15 years. Used to be a keen painter, but she no longer has the energy. Buys the paint and the canvas, but just can't get started. 

We always end up talking art or painting. Told her about the WW100 project, showed her a few bits from blogs on my desktop PC. 

She gets all choked up. "Such waste, such waste. Thousands of them... Such waste..."

So raw is the wounds of Gallipoli still in the psyche of New Zealanders. 
This event has defined our lives, her life, 


Such waste. Such waste.


15 March 2015

Ship Cove, George III's Naval Guns and Captain Cook

A Brush with Capt Cook and George IIIs Navy

Ship Cove: Queen Charlotte Sound 2015

I recently had to opportunity to visit Ship Cove in New Zealand's Queen Charlotte Sound for the second time.


As per my previous visit I was with a group of 40-odd 11 and 12 year old children on a school trip. A lightning visit is was too. Consisted mostly of a  quick lunch, after which I led a half-an-hour tramp (hike for non-Kiwis) up to a waterfall in the stream that Capt Cook watered his vessels from. A brief brush with history, you could say.


On the way there and back a bief look around the memorial, attend to a sprained ankle, and then off fishing...

First details of the Memorial, as story in itself:

British explorer James Cook first brought his vessel, the Endeavour, into this bay in the Marlborough Sounds, in January 1770. Cook himself named the bay Ship Cove and returned to it on four subsequent occasions in 1773, 1774 and 1777, mostly to rest his crews and refurbish and provision his ships.

Captain James Cook spent a total of 328 days exploring the New Zealand coastline during his three voyages. The initial purpose of Cook's voyages was to observe the Transit of Venus in Tahiti and then search for a great southern continent which was believed to exist - Terra Australis. Cook was to return to Ship Cove in Queen Charlotte Sound, on five separate occasions. He spent over 100 days there, as it provided safe anchorage, food and fresh water and timber for repairs to his ship. 1

Cook's First Voyage involved a six month long circumnavigation of Aotearoa/New Zealand. His ship, the Endeavour, sailed into Ship Cove, on 16 January, 1770. He described it as a "very snug cove" and recorded that: "The number of Inhabitants hardly exceeds 3 or 400 people, they leive (sic) dispers'd along the Shores in search of their daly (sic) bread, which is fish and firn (sic) roots for they cultivate no part of the lands".  (Journals of Captain Cook, 6 February, 1770)

Cook's Second Voyage involved two ships, the Resolution, commanded by Cook, and the Adventure commanded by Lieutenant Tobias Furneaux. They left from Plymouth in England on 13 July 1772 and met at Ship Cove in May 1773, but lost contact with each other after they left Queen Charlotte Sound and later both visited the Marlborough Sounds area separately.

Cook later learned that ten men from the Adventure had been attacked and killed at Wharehunga Bay, Arapawa Island. While it was expected that Cook would seek revenge for the killings on his return (third) voyage, he did not, and acted with commonsense and restraint.

Attempts were made by the Europeans to introduce various animals. Furneaux liberated a boar, and a sow and a pair of goats were released on Arapawa Island. Rats, chickens and more pigs were also introduced to New Zealand by Cook's ships. Cook put a ewe and a ram ashore at Ship Cove and was disappointed with his failure to introduce sheep: "Last Night the Ewe and Ram I had with so much care and trouble brought to this place, died, we did suppose that they were poisoned by eating of some poisonous plant, thus all my fine hopes of stocking this Country with a breed of Sheep were blasted in a moment." (Journals of Captain Cook, 23 May 1773)


The Europeans left potatoes, and turnips as well as other vegetables. They also brought serious diseases to Maori, including tuberculosis, and venereal diseases.

During this Second Voyage, Cook recorded that some Maori families were living near their ships and supplying them with fish. He acknowledged that their fishing methods and expertise were superior to those of his own countrymen. Cook left the Marlborough Sounds on 7 June 1773, but he returned to Ship Cove again in November, leaving on 25th November, to return in October 1774, still on his Second Voyage.5


Cook's Third Voyage commanding the Resolution and accompanied by the Discovery, included a stay at Ship Cove "in our old station" in February 1777 to refresh and refit the ships. Captain Cook was 47 years old and clearly weary with the demanding and dangerous voyages and dealing with the various peoples of the Pacific. He began to behave less tolerantly and on 14th February 1779, over-reacted to a theft in Hawaii, which resulted in a fight in which Cook was killed.

During his three voyages to New Zealand, James Cook mapped the outline of the country with considerable accuracy. His observations of Maori culture, and natural history, combined with the observations recorded by his men provide a rich source of information and his comments on the abundance of whales, seals, timber, and flax encouraged British interest.

At the instigation of Robert McNab, minister of lands and a historian of late 18th and early 19th-century New Zealand, this monument commemorating Cook’s association with Ship Cove was erected, and inaugurated by the Governor, Lord Liverpool, on 11 February 1913.


Not a great deal of time to explore the historical aspects, but I took a moment to pause at the memorial to his visits to the area, and get a few snaps.


Obvious to the military enthusiast is a trio of naval guns at the memorial, and an anchor atop the plinth. I snapped a few photos, intending to research the guns a bit better.

 I have come up mostly empty-handed this far. All that I can figure out was that they do not appear to have been left there by Cook, but were placed there at a later date, if you can go by the historical photographs. This one from the 1920s or 30s:


I have been able to figure out that 2 of these are (probably) 12 or 24 pounder SBML (Smooth Bore Muzzle Loading) naval deck guns, sometimes used for shore emplacements. The current replacement carriages appear to be a bit makeshift, and they have no wedges for elevation.

The 3rd (and longer cannon) is seemingly devoid of markings, and seems to have been immersed in water for some time, and has damage to the muzzle. All three are cast iron cannons, which would date them to the 18th Century.

The 2 better preserved guns bear the Royal Cypher of George III, and are of the Armstrong design, rather than the later Blomefield. This places their date of manufacture somewhere in the last 5 decades of the 18th Century, or 1st decade of the 19th. This does fit with the time Cook explored the Pacific in his Endeavour and Resolution. Placing them at the memorial has proven historically accurate then.

Barrel Top Markings: The barrel has an embossed cypher: A crown above a stylised mark of a 3, G and R entwined. This indicates 'George Rex' and is the royal symbol of King George III who reigned from 1760 - 1820. Many of these and the later Blomefield design were used in the Napoleonic wars, and were standard English Navy issue guns.

George III had by the mid 1810s succumbed to mental illness (now though to be due to porphyria), and his son George, the Prince Regent had been granted Regency powers in 1811.

George III's long reign was marked by a series of military conflicts involving his kingdom and much of the rest of Europe. Early in his reign, Great Britain defeated France in the Seven Years' War, becoming the dominant European power in North America and India.

However, many of its American colonies were soon lost in the American Revolutionary War, which led to the establishment of the United States. Later, the kingdom became involved in a series of wars against revolutionary and Napoleonic France, which finally concluded in the defeat of Napoleon in 1815.


My photograph of one the southernmost gun at Ship Cove


Comparison gun cypher from a gun in Pietermaritzburg, South Africa (nicked off the net)
(Happy to credit photographer if requested)


Below the crest is a broad arrow signifying British government ownership of the weapon.

The design of the guns, specifically that of the knobs/butts or buttons lead me to believe they are therefore Armstrong or Armstrong-Frederick designs rather than Blomefield (See my reasoning below) . I did not have time to take photos of other distinguishing aspects such as manufacturers marks on the trunions, much to my frustration. I would love to learn more about the history of the Ship Cove cannon.

I have tracked down two similar guns, with a fascinating history of their own:

The Johnsonville guns (clicky)

These guns (Johnsonville/Trentham) appear to be the of a different (and later) manufacture though.

The Ship Cove guns are missing the quoin or aiming/elevation wedge.


On the deck of a ship the gun would have been restrained with ropes to control the recoil


Armstrong and Blomefield:

In 1722, John Armstrong became the English Surveyor General of Ordnance. He was a man of immense energy who controlled the development of British ordnance over the next 20 years. He set about improving upon, and adding his own stamp to, the standard designs developed by Borgard.

By 1725 he had developed a complex series of proportions which governed the dimensions of every section of the cannon. Gone was the craftsmanship and decorations of the last century. What was left was a cast iron brute which could be cast to the same specifications by any foundry.

NPG 5318, John Churchill, 1st Duke of Marlborough; John Armstrong

Armstrong (standing with the seated Duke of Marlborough)

Some minor modifications were made to the Armstrong pattern in 1753 under the guidance of Charles Frederick as Surveyor General, and thus creating the Armstrong-Frederick pattern gun. The Armstrong, or Armstrong-Frederick was finally supplanted in 1794 by the Blomefield pattern gun.

All in all, the Armstrong was a successful and resilient design and it was still present on British warships as late as 1808.


Armstrong's design for naval guns


Blomfield design - note the redesigned button with a loop
This gun is also mounted on a metal garisson type carriage vs the naval carriages above.

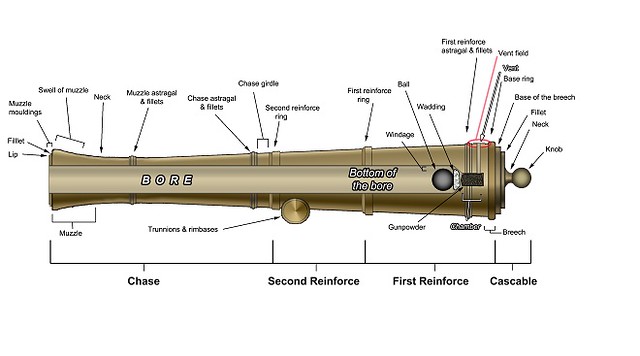
 General anatomy and terminology of a SBML Naval Gun of the 18th Century:

Once John Armstrong had finished his basic design for British artillery in 1725, there were only marginal changes to the template over the next 70 years.

That changed In 1780, when a 36 year old artillery captain was appointed as Inspector of Artillery and Superintendent of the Royal Brass Foundry. Thomas Blomefield, was 11 years old when he was sent to sea on HMS Cambridge  under a close friend of his father, Sir Peircy Brett. His naval career was short lived and in February 1758 he enrolled as a cadet at the Royal Military Academy at Woolwich.

He was a talented student, gained the notice of his professors and passed out as a lieutenant eleven months later at age 15. He saw combat in the West Indies and Florida. He became aide de camp to General Conway, who was then acting Master General of the Ordnance and was retained in that position by his successor, Lord Townshend.

He resigned that high profile post to serve in the war in America. He was wounded in the head at Saratoga, returned to his duties as aide to the Master General of Ordnance. In 1780 he was appointed Inspector of Artillery and Superintendent of the Royal Brass Foundry.

At the time Britain’s military administration was virtually belly up. The nearly medieval system of military administration used by Britain was obviously incapable of supporting an army and navy engaged in a worldwide war.

Blomefield set about his task with energy. In his first year he condemned 496 new artillery pieces and unsuitable before they were sent to the army or the fleet. This represented about a quarter of the national production.

Around 1783, Blomefield set his hand to designing artillery. Apparently he was a dedicated experimenter and used his experiments to inform his designs. There are several key deviations from the Armstrong-Frederick pattern gun in the Blomefield gun.

First, it is much more simple in design. A lot of the more decorative features at the cascabel were done away with to ensure a uniform thickness of metal.

Second, an attempt was made to lessen the weight of the gun by trimming the thickness of the tube while retaining a strong breech. This is a theme one sees with cast iron guns probably culminating in the Parrot guns

Third, the chamber for the powder bag was a bit larger in diameter than the bore. This resulted in a better burn rate for the powder and hence a higher muzzle velocity.

Lastly, a loop was forged over the knob on the cascabel. Aboard ship, this enabled the breeching rope to pass through the loop rather than being looped around the knob. This subtle change enable shipboard artillery to be shifted much farther off the center line because it could be fired with the risk of snapping the breeching rope.

After 1794 the Blomefield pattern gun was the standard within the navy.


14 February 2015

Progress on the Turks

Gallipoli and The Turks: Diorama Progress report

I finally got a bit of time to progress the Turks I've built for the WW1 display in Wellington. Diorama to commemorate the Battle of Chunuk Bair.


Applied the first coats, and washes to the trousers and helmets helmets- starting to look like them Ottoman Gentlemen warriors now 


Have applied washes to uniform jackets now, pics to follow...

:

10 February 2015

Gallipoli Project: Becoming a Part of History

Gallipoli: A Century on: A Gamer and Modeler's dream: Becoming part of History (or the depiction there-of)


So this email arrives. Sir Peter Jackson of Hobbit and Lord of the Rings fame has sent out a missive. Ok, not no me directly, but to our wargames club. Via, via:

 A call to arms for gamers and modelers. Unfortunately limited to Kiwi Wargamers only !

He wishes to produce a large scale diorama in 54 mm depicting the Battle of Gallipoli. A milestone battle in WW1; where New Zealand, Australia and the UK sacrificed thousands of their young men in an assault on the Ottoman Turk mainland.It is to depict the Battle of Chunuk Bair.

 Imortalised in many movies now, (The Dardanelles Campaign and Gallipoli) is branded on the psyche of every Kiwi and Aussie. The war memorial in Wellington has had a complete make-over, and Sir Peter personally commissioned a 4000 54 mm miniatures from Perry in the UK to make up a diorama to commemorate the centenary of this battle. 

If you are in NZ and willing to help let me know and I can put you in touch with Rhys:

"Hi everyone,

Quick Summary: I am asking your help in organising wargamers around NZ to paint 4000  54 mm figures for a Gallipoli diorama in Peter Jackson's Great War Exhibition, the ANZAC Diorama.

One of my adventures in life is to be involved with Peter Jackson in creating the "New Zealand Great War Exhibition", which will open on Anzac Day this year and run through to Armistice Day 2018. It will be housed in the former Dominion Museum building in Wellington, behind the Carillon and the new Memorial Park. With both Peter Jackson and Richard Taylor doing the exhibits, and the historian Christopher Pugsley doing the Historical Curating, we know that this is going to best a best-of-world-class exhibition. However, with Peter being tied up until recently, completing the last Hobbit movie, we have an ambitious time frame to complete the work.

One of the displays that he is building is a diorama of the battle of Chunuk Bair, on the Gallipoli Peninsula. Over Christmas he has commissioned the Perry Twins to make 4000 x 54mm Turkish and New Zealand soldiers. We now have until late March to paint them. I am seeking your help to find about 100 good painters who are willing to paint about 40 figures each over the next two months. I have attached some images of some of the figures that the Perry's have produced, as well as the early version of the Turkish painting guide (note that there is at least one error in it, so it is not the final version). The Perrys have about 600 figures that they will dispatch this week as the first batch. Note that the figures are designed for a diorama of trench fighting on the hill-top, so many of the figures are climbing the slopes or through the trenches - hence the poses.

As with the Lord of the Rings and Hobbit movies, Peter wants all of New Zealand involved, so that it becomes an exhibition of New Zealanders, by New Zealanders. I think that this is a great opportunity to get involved in something very special, as well as a chance to raise the profile of wargaming clubs through local media articles.

Many of my wargaming friends here in Wellington have pitched in to provide me your names from around the country, as points of contact for the clubs, so can you please help in this venture? For a historical "feel good factor" my intention is to divide the country up into the WW1 recruiting zones: Auckland (everything north of Taupo), Wellington (south of Taupo and including Taranaki and Hawkes Bay), Canterbury (everything north of the Waitaki) and Otago (south of the Waitaki), with a one club coordinating the painting by all the clubs in that region. Roly Hermans is helping me get the news out to people through the NZ Wargaming forum and we will also establish a website that will be updated with painting progress and all the information needs for the painters and other interested parties. The painting guides will be available on the site for downloading.

If you can help with this, or can pass me on to someone who can, then I will be indebted to you. I am particularly seeking a volunteer person, or club, to honcho each region. That will involve the distribution of the figures to the other clubs and painters, monitoring progress, updating the website (you will have partial administrator rights), collection and the dispatch of the painted figures back to me. Please get back to me to either confirm your interest or to refer to someone who can help. If you are able to be the regional honcho, then a mailing address for the dispatch of the figures would be great.

The contribution of the clubs will be recocgnised in the exhibition and the website will remain as a record of the achievement.

Please help. This will be something that you will all be proud of when you visit the exhibition, perhaps during Call to Arms this year.

Rhys Jones
The Arm Chair General (for real)"

The official page: ANZAC DIORAMA

Last week I received my first 10 figures to build and paint. Quite strict instructions, as would be necessary for the uniformity of the look. The Kapiti Wargames club was allotted Turks for the first run. I received mine on Thursday, and have now assembled them:


Unassembled figures as they arrived from Perry


How do you do, Ottoman troops


Blurry picture from my phone, but you get the gist


Even worse one during the assembly process. Flash and mold lines cleaned, now for the Araldite. Yes. Araldite is recommened. 

How I hate you, Araldite. You are not even good for King Tut's Beard, if you haven't caught up with that saga yet: Here it is: Link to distraction about King Tut's Beard being broken off.


Dear Araldite. I hate you. Yours sincerely. Herman.


Finally assembled. Let the assault on Chunuck Briar begin. 
No, wait. We have to fill up those gaps first. 
At ease, men!

8 January 2015

Happy New Year to All!

Happy 2015

 - Yes I know it is 10 days into it already, but some of us worked through the festive season. Anyhow, best gaming wishes for everyone out there!


May you have a happy and victorious 2015 on the table-top


22 November 2014

The Facts and the FURY: M4A3E8 Sherman

FURY: M4A3E8 Sherman in the movies

I saw “Fury” with my son Luc, and Mark T. and his son Cameron last night. Stopped for a curry at at our favourite restaurant on the way in, and settled in to watch the latest war movie offering at the local cinema.


I thought it was well worth the effort.  A brutal, realistic, violent portrayal of tank warfare, a story not often told. I thought it one of the better movies I've seen focusing on the subject.

“Fury” revolves around the tank crew of a late war M4A3E8 Sherman tank with the name “Fury” crudely painted on the barrel of its 76 mm gun.  The crew is commanded by Staff Sergeant Don “Wardaddy” Collier (Brad Pitt).  The rest of the crew consists of veterans Boyd “Bible” Swan (Shia LaBeouf) the gunner, Grady “Coon-Ass” Travis (Jon Bernthal) the loader, Trini “Gordo” Garcia (Michael Pena) the driver and the very green and sensitive Norman "Eventually to become Machine" Ellison (Logan Lerman), a soldier from the typing pool press-ganged into serving as the bow gunner due to a shortage of trained tank crewmen.

From a historical equipment and military hardware depiction perspective, the movie is great.  Unlike most other war movies I've seen there are relatively few inaccuracies to distract from the movie’s message.

I appreciated the use of  different types of rounds against different targets as well as  personal idiosyncrasies of the lead character carrying a colt six-shooter revolver (A-la Patton, albeit not a pair of pearl handled six-shooters) and a German MP 44 SMG, and also the hypocrisy of looting war medals off dead enemies, displaying them in the tank; and then shooting a German soldier who was wearing a US trench coat in the back. There was several sub-plots that I found quite interesting: History buffs may have picked up on some of them. I may also have missed a few. Later more on that.

The interactions between soldiers, superiors, subordinates, civilians and the enemy come across well, although a bit stereotyped. (Inexperienced and disrespected junior officer sending the platoon off to their doom, and the battle-hardened field commander, "You're all that we have", sorry to send you-in-but-hold-the-line-and-buy-us-time cliches)

Speaking of stereotypes, the director/screenwriter (thankfully) chose not to have the stereotyped African American, Jewish or Italian crew members. No slur intended in saying this, but in some ways I found it refreshing to escape the common Hollywood angst subjects. Instead they opted for a Hispanic, bible punching Episcopalian and a Cajun Swamprat...

German officers were the usual (ho-hum) stereotypes of fanatical Nazis who mindlessly send their troops in to die and kill innocents left right and centre. Even the field officers. Historically this was not the case. Just like the British and Americans, German officers and NCOs led from the front, cared about their men, and even late in the war, and suffered an incredibly high rate of attrition.

The final scene of droves of SS troopers in a suicidal rush attacking a tank with small arms while their officer stands by egging them on, is a little hard to believe. When they were seen marching up they had enough shouldered panzerfausts to make them look like an asparagus field! The officer than later cracks open a packing case, nowhere seen before, and exclaims: "These are the only ones we have"

These were supposedly elite soldiers, well led and trained, and even if inexperienced, their NCOs/officers would not have committed them to a suicide attack while they had perfectly good anti-tank weapons. Against an immobilised Sherman. And not taking cover ? Deploying the MG 42 in the open ?
But I suppose you could pick holes in anything, and the object of the movie is entertainment, and not military accuracy after all.

The German speakers among us also probably picked up that the subtitles were quite often inaccurate to what was being said or written on the placards of the executed civilians, for example. Not that it detracted majorly from the story line, but just saying. (One placard on a strung up woman read: "I would not let my children go to war" and it was subtitled " I would not go to war" and Brad Pitt also read out it incorrectly to his crew. So much for being a German speaker as the movie implies. (Think a little pathos in the script was lost there as a result.)


He also addresses the 20-something young woman as "Maedchen (little girl) where any German speaker would have addressed her as " Fraulein" (Young Lady); as the subtitles this time grammatically correctly read, but did not reflect what he actually said.

The unsung heroes of the movie are the tanks though.  The movie features the only running Pzkfw VI Tiger tank in the world (The Bovington Tiger) and uses several versions of the Sherman which would have been very accurate for the time. In Saving Private Ryan a T-34 was dressed up to vaguely resemble either a Tiger or late model PzKfw IV.

 Unlike in today’s combat units, Allied units did often have mismatched equipment as new vehicles were supplied to replace older models that were destroyed/damaged beyond repair in combat. Older models were retained until they were considered obsolete or unserviceable.  This is noticeable when looking at the American tank platoon that had various models of the M4 Sherman (at least 3 that I could identify without losing the plot of the story by focusing solely on the hardware)


This is historically important, as only the last production model Shermans (Armed with the 76 mm high velocity gun) had any real chance of penetrating most German heavy and medium tanks (Pzkfw V Panther  and Tiger I and II by the end of the war) at a distance. German tanks could engage and destroy Shermans at long range, whilst the standard 75mm rounds failed to penetrate the thick frontal armour of the German tanks. It wasn't uncommon to need a five to one (or more) ratio of Shermans to one Tiger to overwhelm the enemy.

The Bovington Tiger

This is accurately portrayed as the 75 mm guns fail to make any impact on the Tiger and its 88 mm take them out with comparative ease over the same distance. The 76 mm of the Easy 8  also only destroys the tiger at short range, from the rear, and by out-maneuvering it, and then firing 2 shots at point blank range

Click here for a walk-around the Sherman M4A3E8 (Easy Eight) that was used in the filming of Fury

One criticism I would have of the fire-fight scenes is the decision to use laser to depict tracer. The flight paths were inaccurate and it looked a little like star-wars. (But then that was probably a safety decision, but it could just as easily have been done in CGI.)


 If you've ever seen real tracer fire you'll agree it looks nothing like that. The flight path is more parabolic and appeared linear in the shots. Though the US did use blue tracer, it was far more common to use a yellowish red.The only picture I could find (above) shows the red tracer, but the blue was very apparent in the movie.


I enjoyed a the good Hollywood style yarn, never the less.

The Guardian in the UK has the comments from a 91 year old radio operator veteran on the movie:

"Fury accurately portrays how superior the German tanks were. A Sherman provided you with protection against most enemy fire but against a Tiger it could easily become your coffin. I remember a very near miss where an eight cm shell from a Tiger tank went within inches of our turret and we decided not to stay around too long after that. In open combat we never had a chance. So, like in Fury, we always had to be one step ahead. It was only because we could call up air strikes and had many more tanks than the Germans that we eventually won."

As the film makes clear, a Sherman tank was a lightweight in comparison to a Tiger. The Sherman weighed 33 tonnes and had a 75 mm gun, compared to the Tiger's 54 tonnes and a 88 mm gun. A Tiger also had 3.9 inch thick armour, so shells from a Sherman literally bounced off it.

"Fury shows just how vulnerable you were fighting in a Sherman tank. There is a lot of blood and gore in the film but nothing can really come close to the true horrors of tank warfare. I saw people being blown up and burnt alive. Going to see Fury you don't get that dreadful, nauseating smell of burnt flesh. That will stay with me forever."

"I was in the Essex Yeomanry, a territorial regiment. All the crew were from Essex except me. It took us a while to get along but then I trusted them implicitly with my life. We fought along side the Americans in their Sherman tanks and I found them to be very brave. We didn't write the name of our tank on the barrel like they did in Fury or plaster the inside with photographs but we were just as proud of our tank. Ours was called Beverley and her name was written on the turret."

The corpses certainly mount up in Fury, particularly in the final scene. This was the only part Bill,  (the veteran) too, felt lacked credibility.

"I thought the film showed accurately how tough life could be in a tank, but the final scene where the crew hold out against a battalion of Waffen SS troops was too far fetched. The Germans seemed to be used as canon fodder. In reality they would have been battle-hardened and fanatical troops who would have easily taken out an immobile Sherman tank using Panzerfausts (an anti-tank bazooka).

They also seemed to have an inexhaustible supply of ammunition and fuel. A Sherman tank only does five miles to the gallon so I think they would have run out long before the final showdown."


The Easy 8 used in the film as well as the Tiger are now on display at Bovington. Clink on the link for more pictures of both vehicles and the opening of the display: Blackmore Vale Magazine